
Greeting Cards
Objectives:
-Students plan and execute group photo
-students demonstrate creativity and planning through the background and theme chosen
-Students add 3 borders around their photo
-Add photoshop text or calligraphy, with a pattern clipped to text
-Students plan and execute group photo
-students demonstrate creativity and planning through the background and theme chosen
-Students add 3 borders around their photo
-Add photoshop text or calligraphy, with a pattern clipped to text
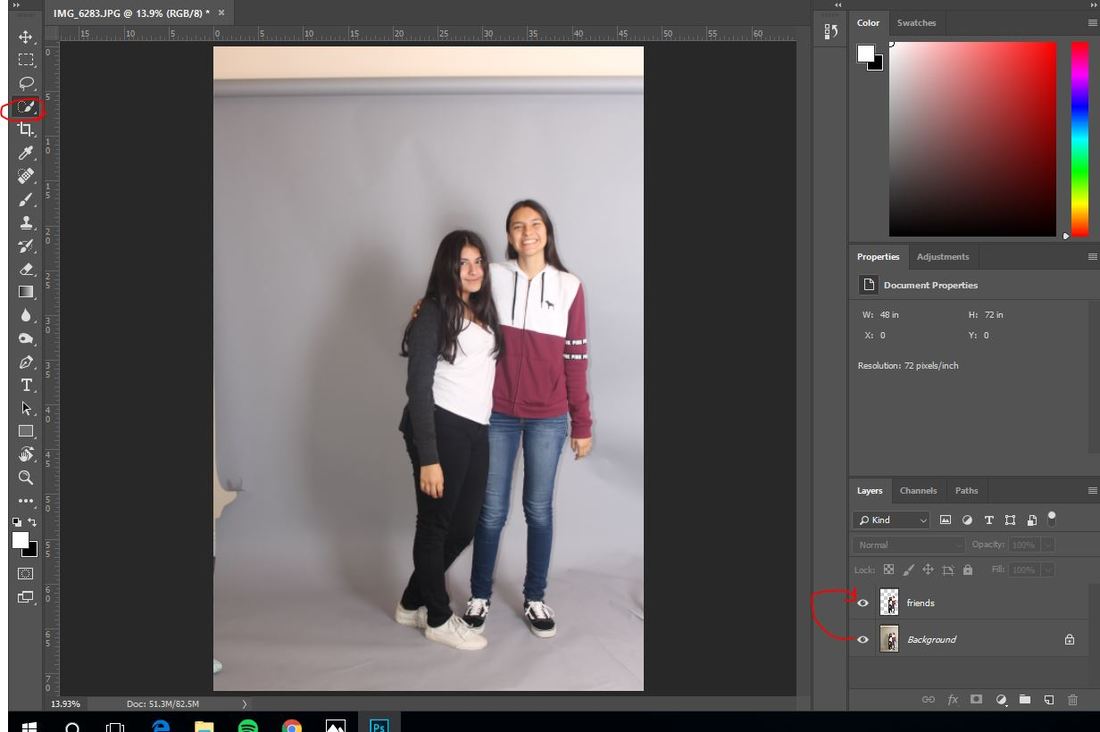
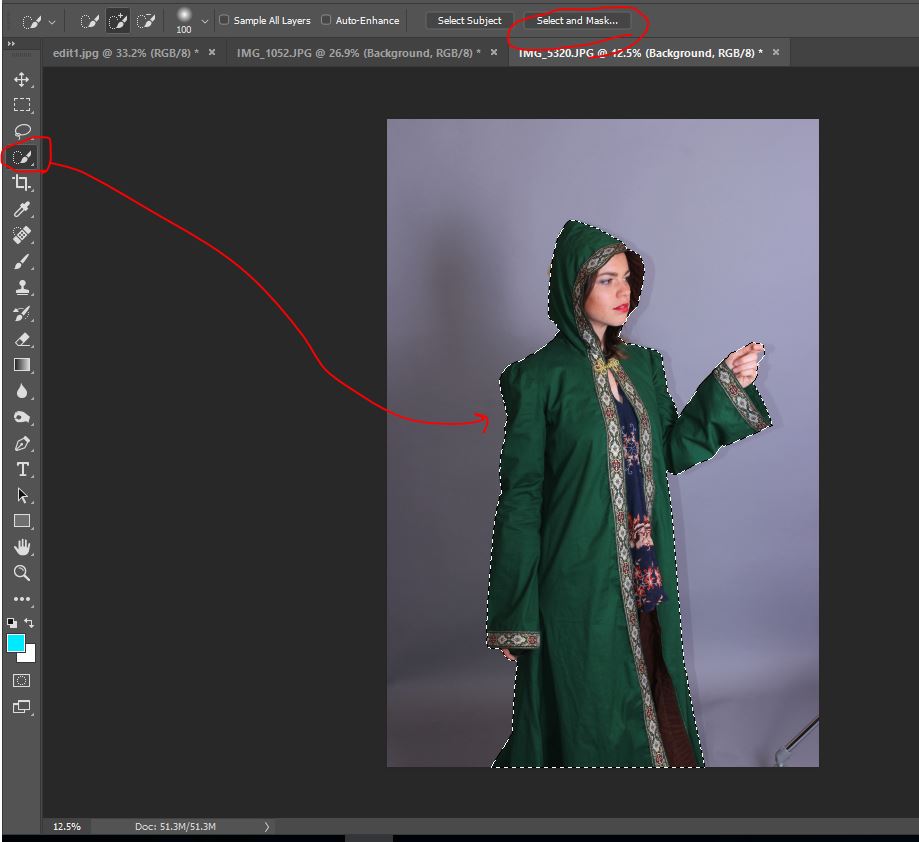
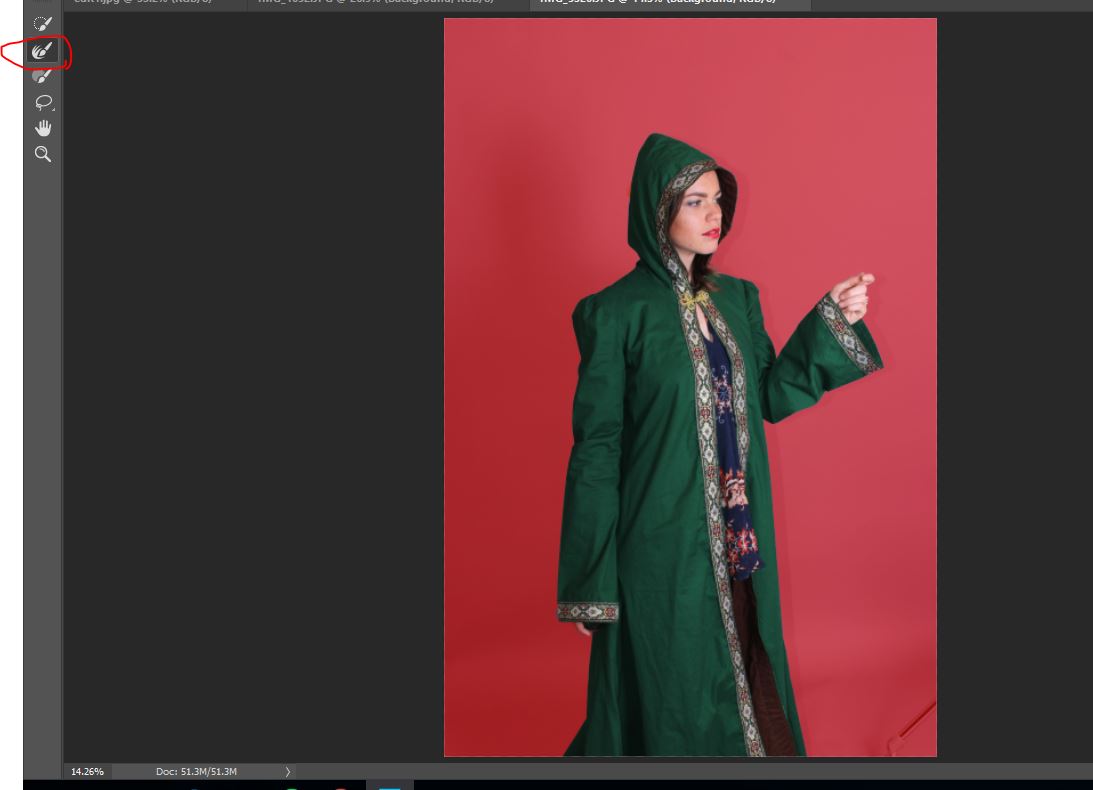
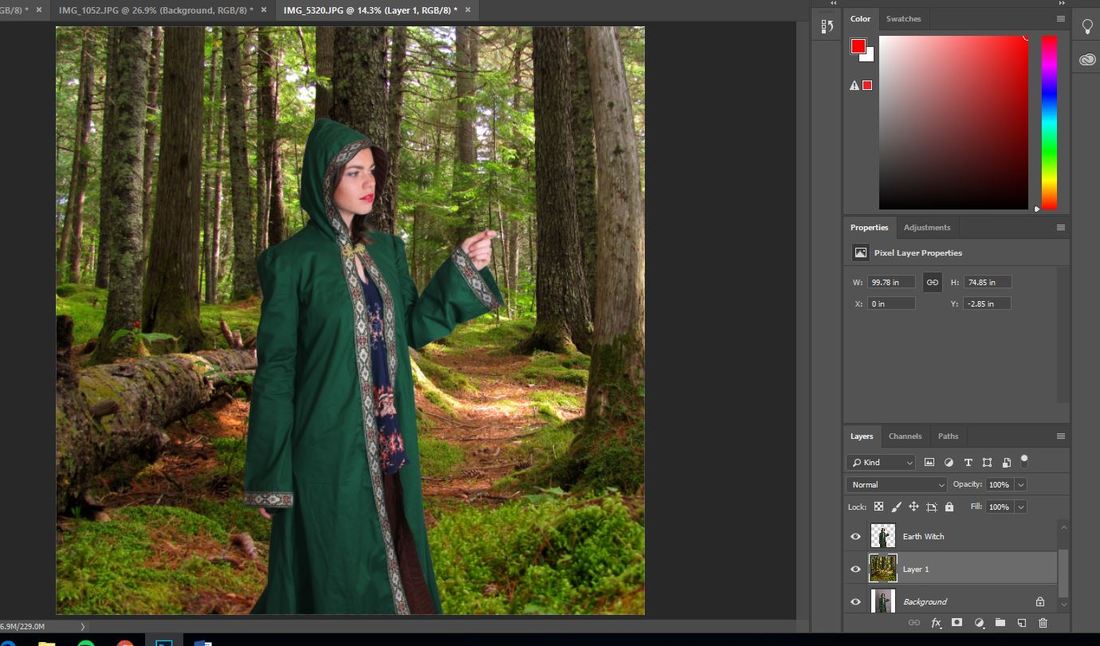
1. *If you shot in the studio, or want to change your background: Use the quick select tool to select your group, use "Select and Mask" to refine your edge, and then jump the group to their own layer (ctrl+j). Make sure to label your new layer.
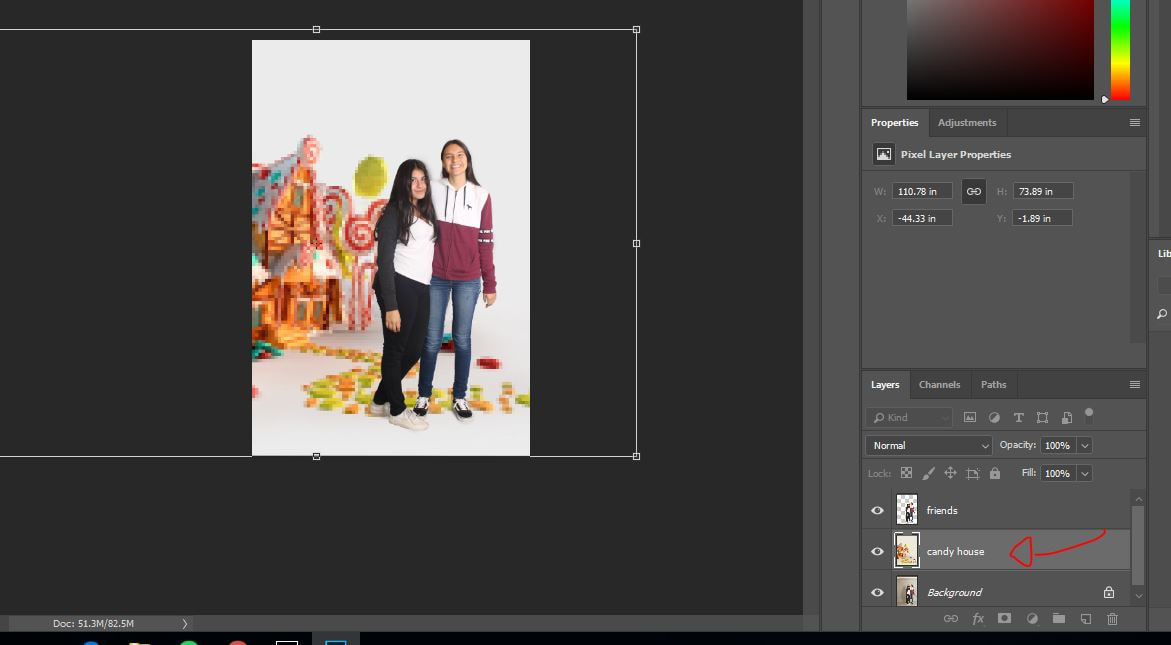
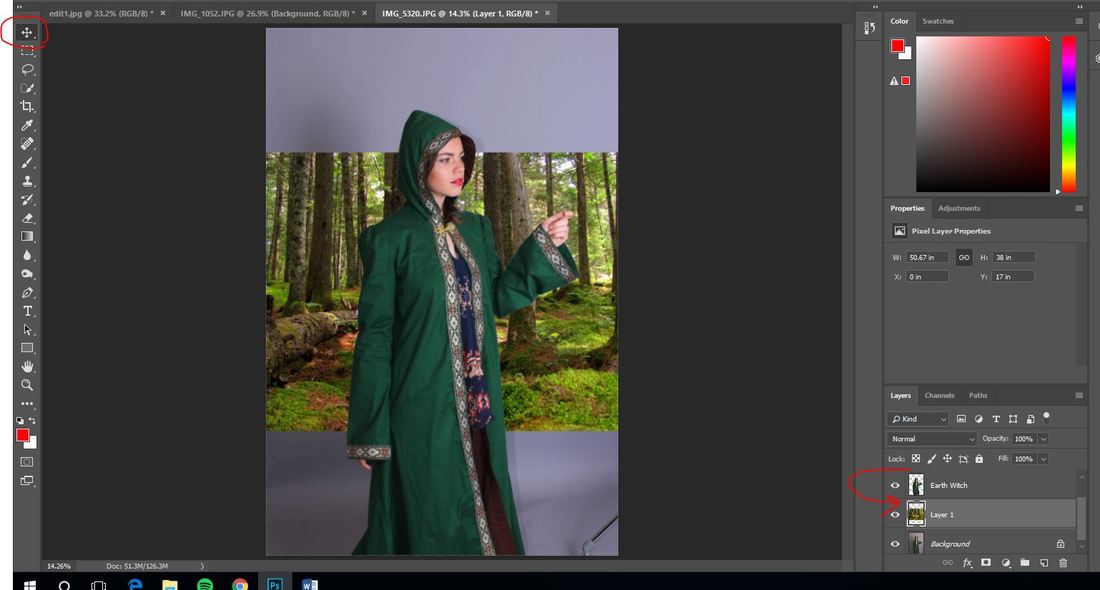
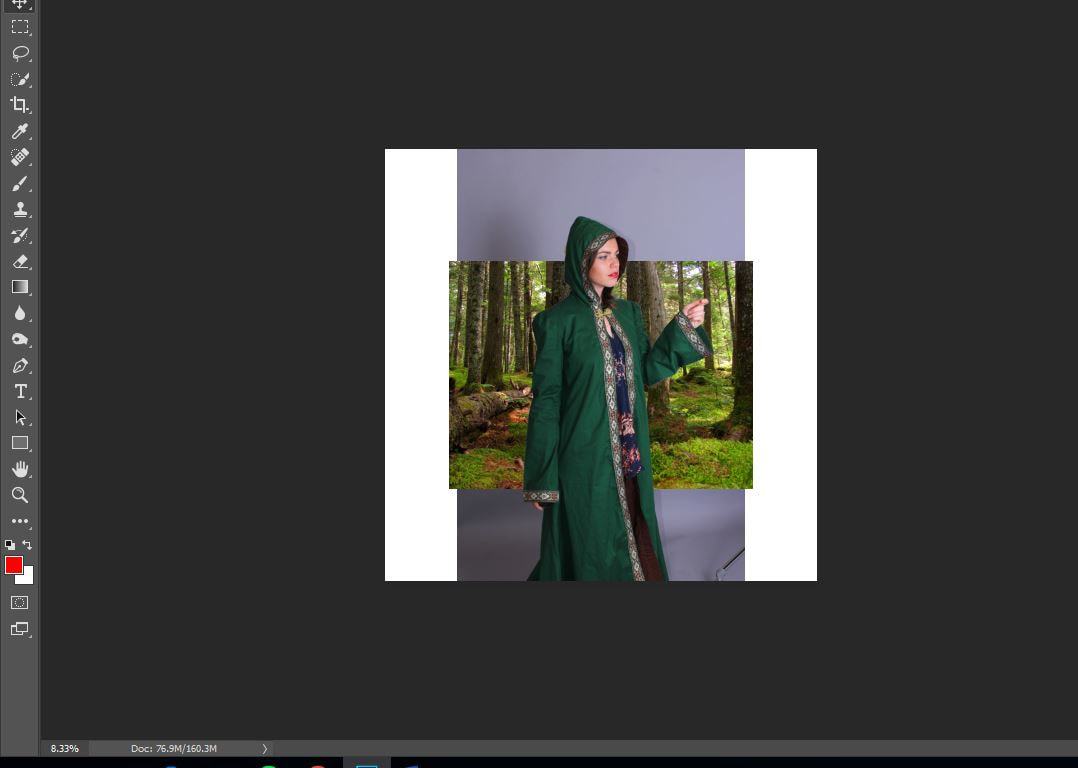
2. Find and copy your new background, and paste it underneath your group layer. Don't forget to hold shift to keep your photo in perspective
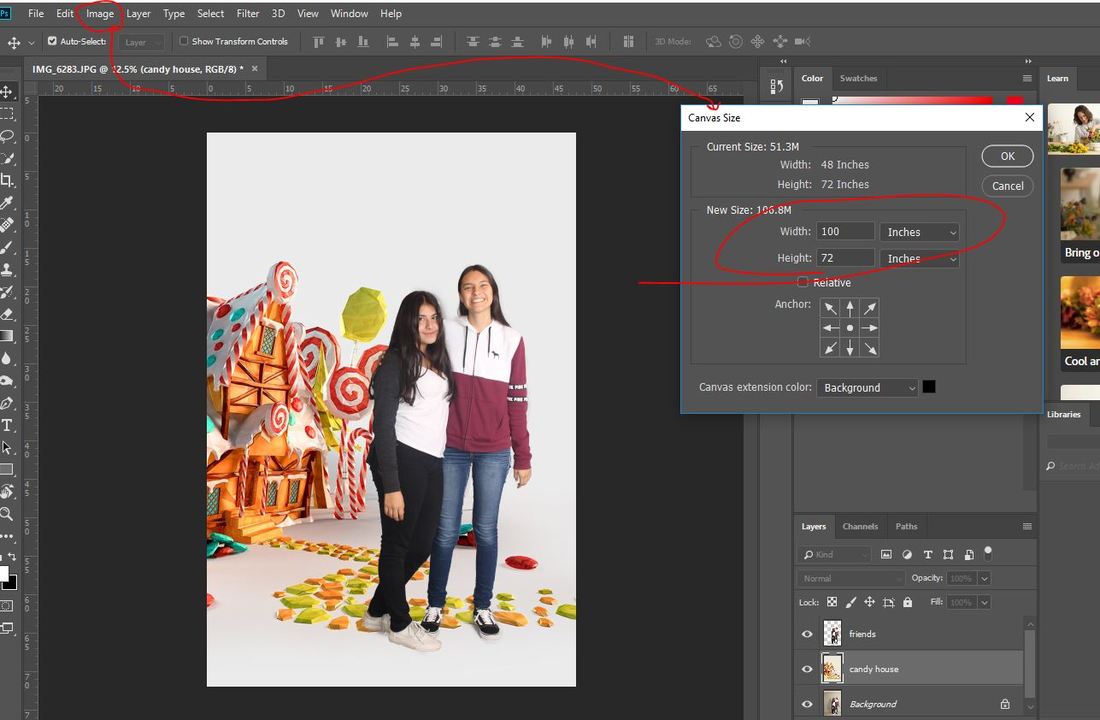
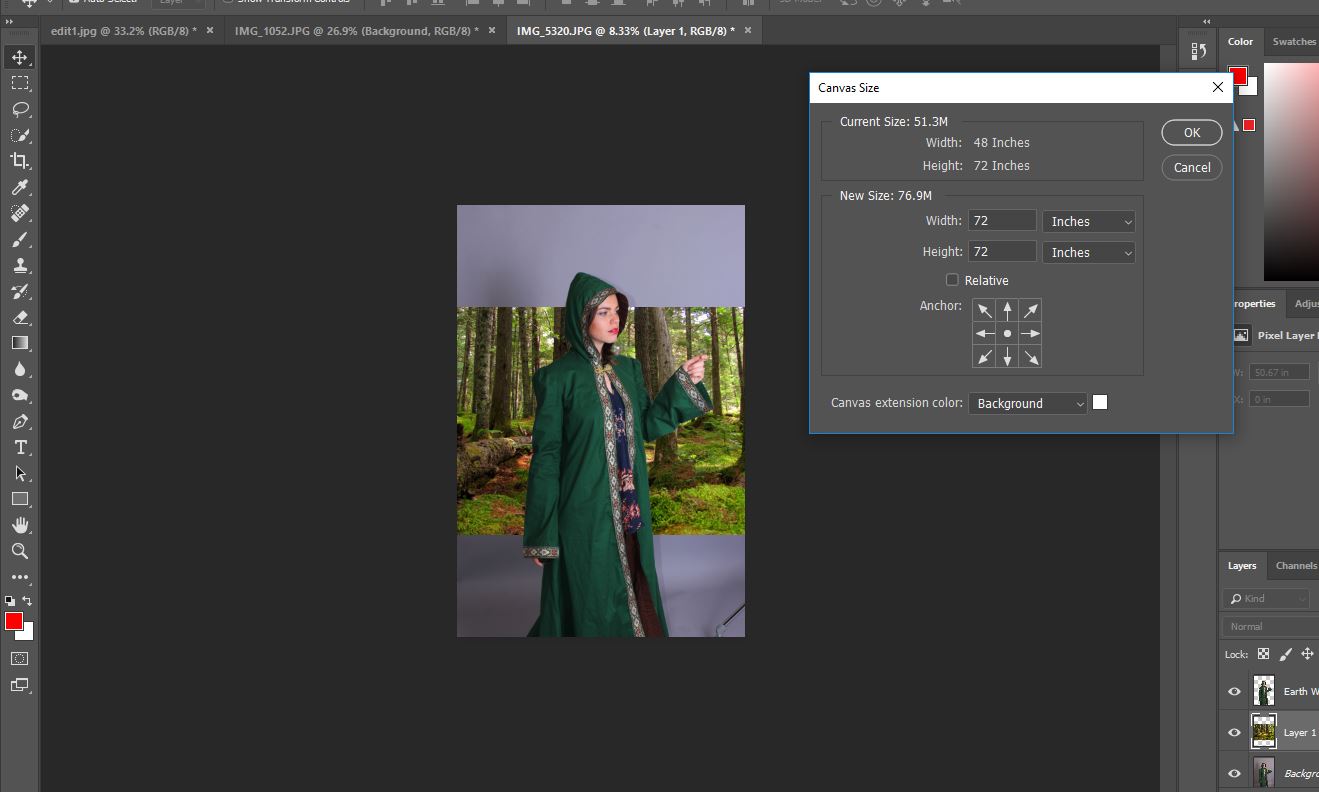
3. If your canvas isn't big enough for the new background, go to Image > Canvas Size, and raise the number for width or height, if needed.
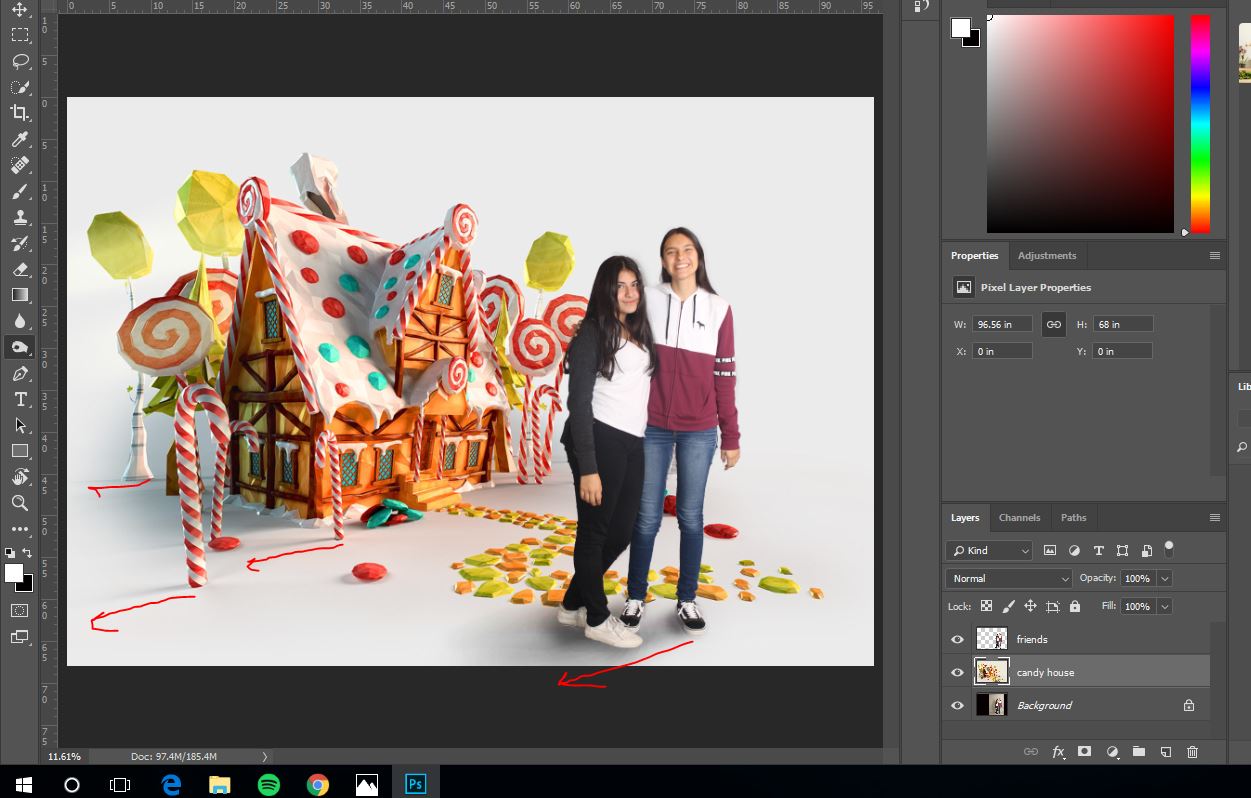
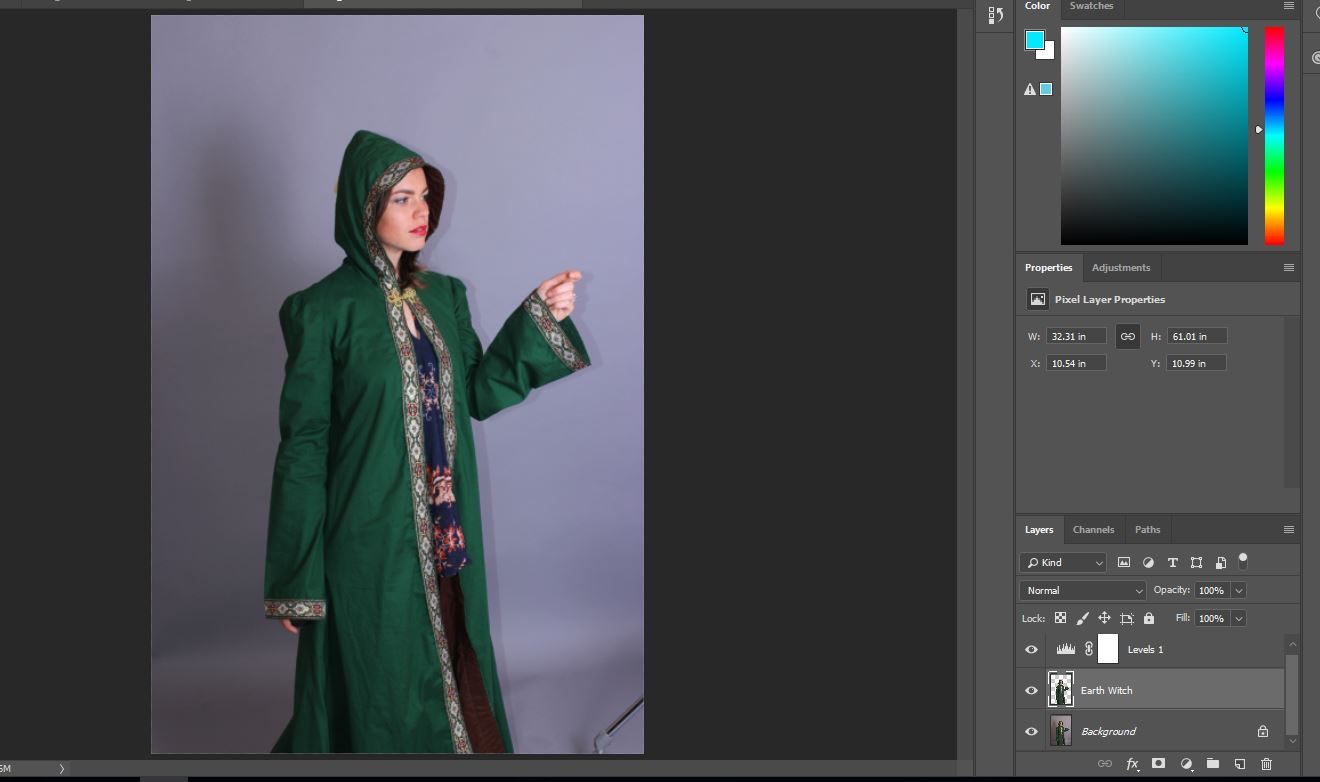
4. Don't forget to add the shadow on the background layer! Look which direction the shadows are falling in your background photo, and use the burn tool to make shadows going in the same direction.
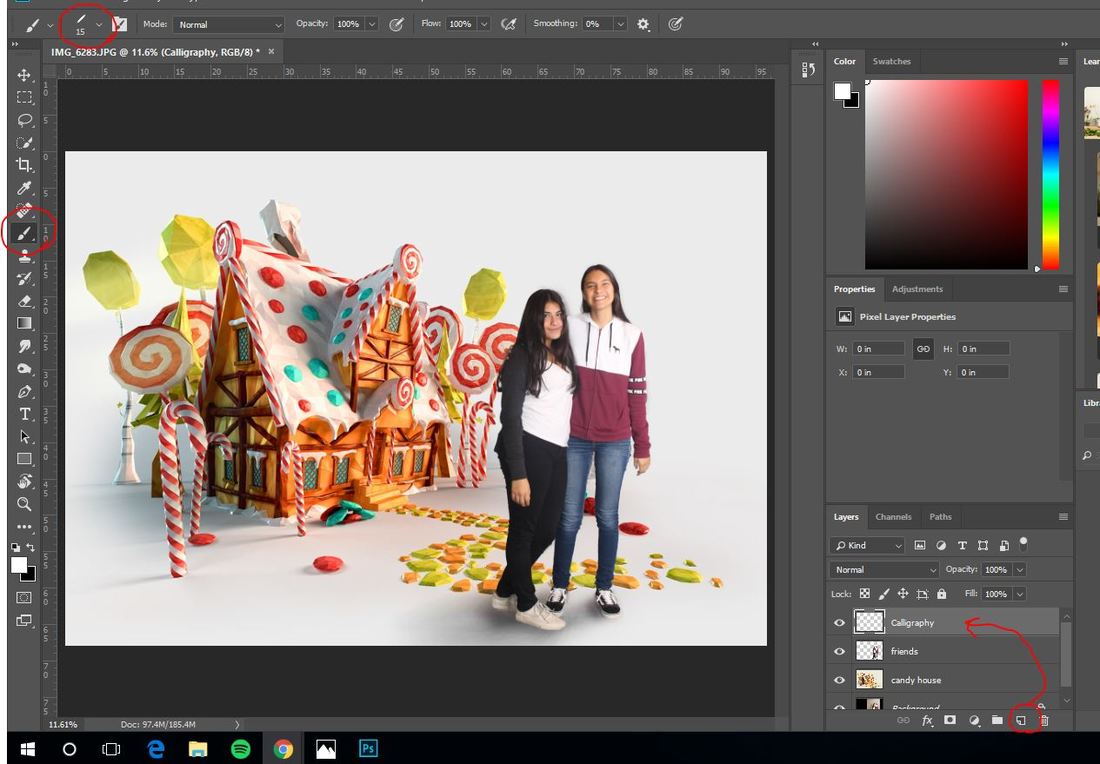
5. Add a new blank layer for you to write on.
6. Change your brush to a calligraphy brush. Click on your brush, in the top right hand corner there is a gear wheel icon. Click that gear and choose "legacy brushes". This will give you more brush options. If you look through your brush option folders, you will now find "legacy brushes", and a folder within it called "calligraphic brushes". Choose a brush from those options. Your brush should be long and slanted.b
6. Change your brush to a calligraphy brush. Click on your brush, in the top right hand corner there is a gear wheel icon. Click that gear and choose "legacy brushes". This will give you more brush options. If you look through your brush option folders, you will now find "legacy brushes", and a folder within it called "calligraphic brushes". Choose a brush from those options. Your brush should be long and slanted.b
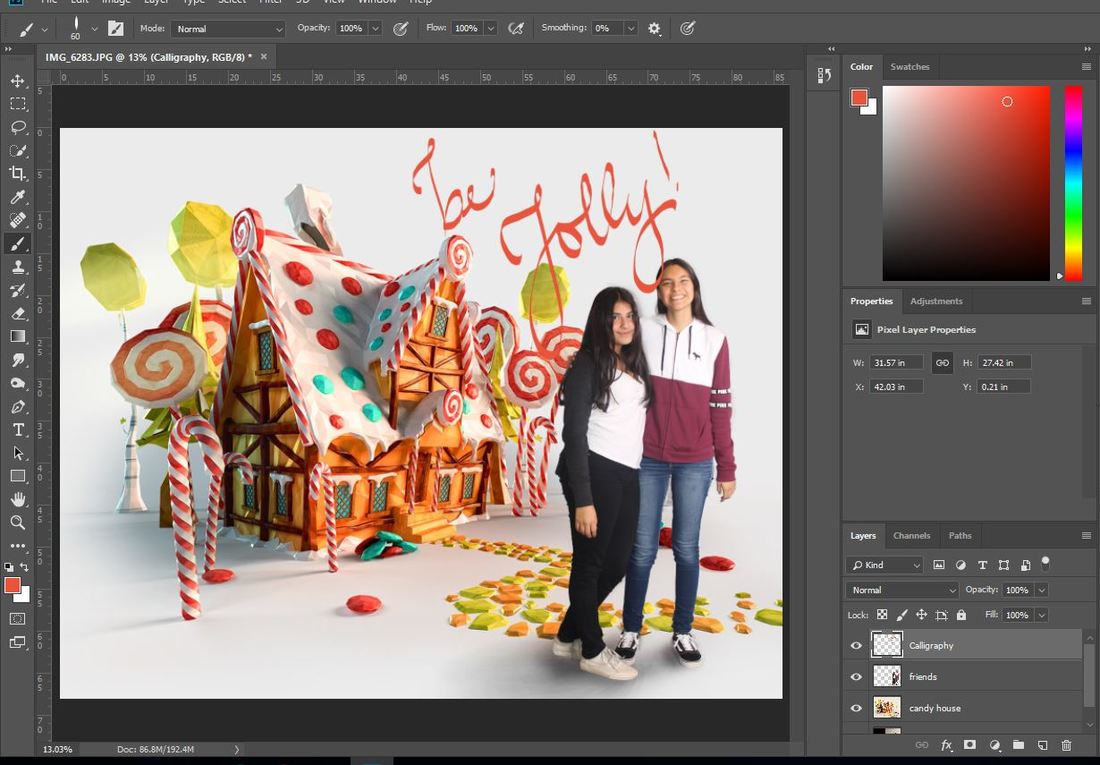
7. Before you start to design your message, check google for inspiration. I typed into google images: "tis the season to be jolly calligraphy" for inspiration. It should take a good amount of practice before you're satisfied with your work (Don't get frustrated-just keep trying!)
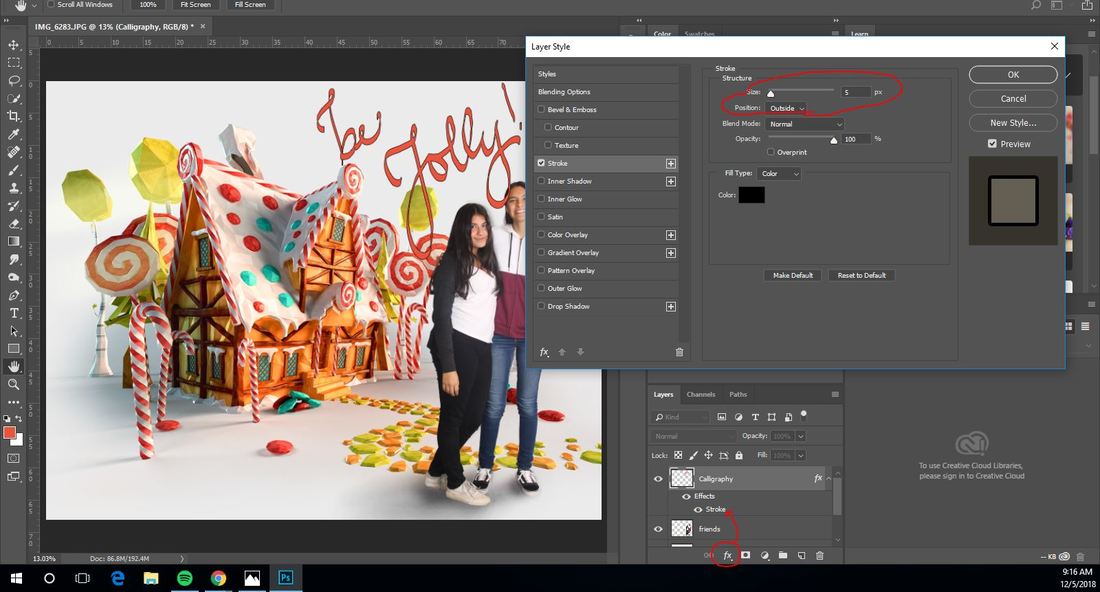
8. In order to get your calligraphy to stand out from the background, add a stroke outside of it (an outline). Click on "fx" while on your calligraphy layer, and choose "stroke". Change the position to outside, and play with different sizes. You can also change the color. Press "OK" when finished.

9. Add a signature with the text tool. Click the 't' on the side bar, click and stretch over the area you want to write on. Change the font size at the top to a large number (at least 300 pt to see the font). You can also choose the font you would like.
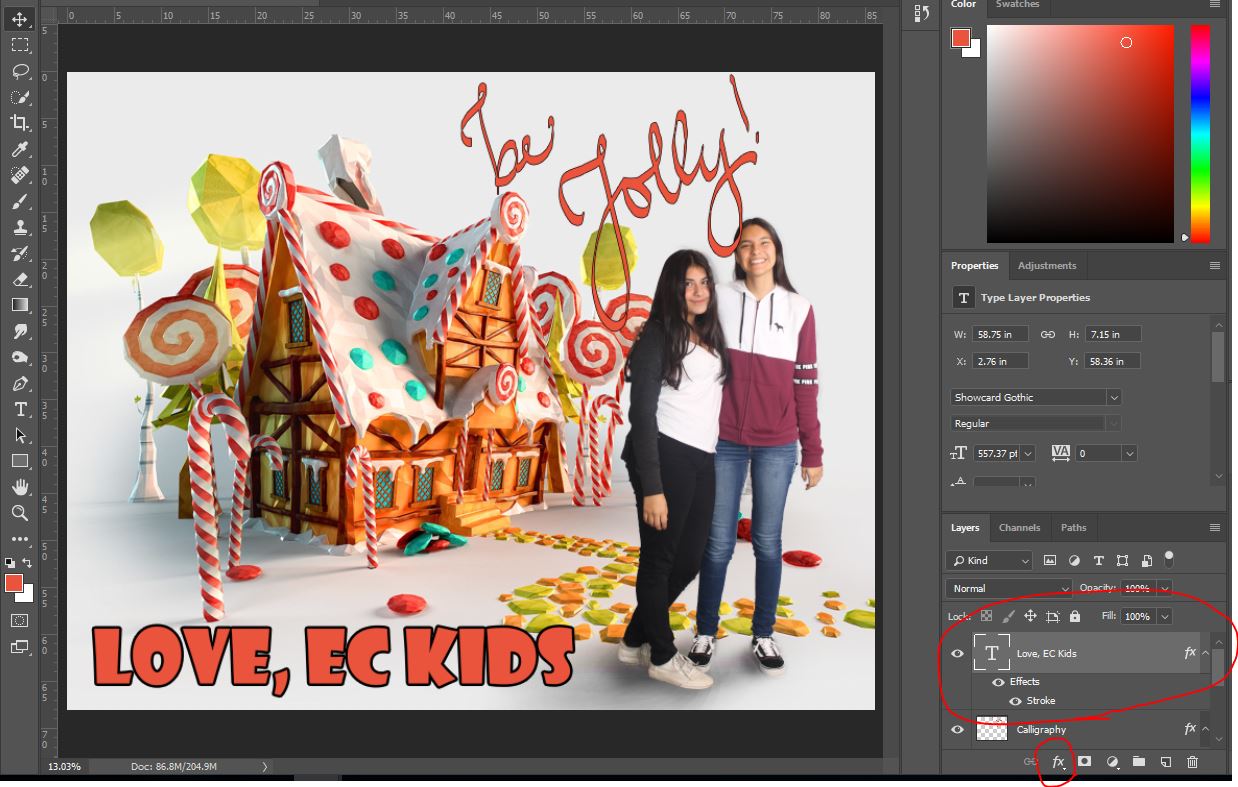
10. On the text layer, go into "fx" and add a stroke to the text, the same way you did in step 8.
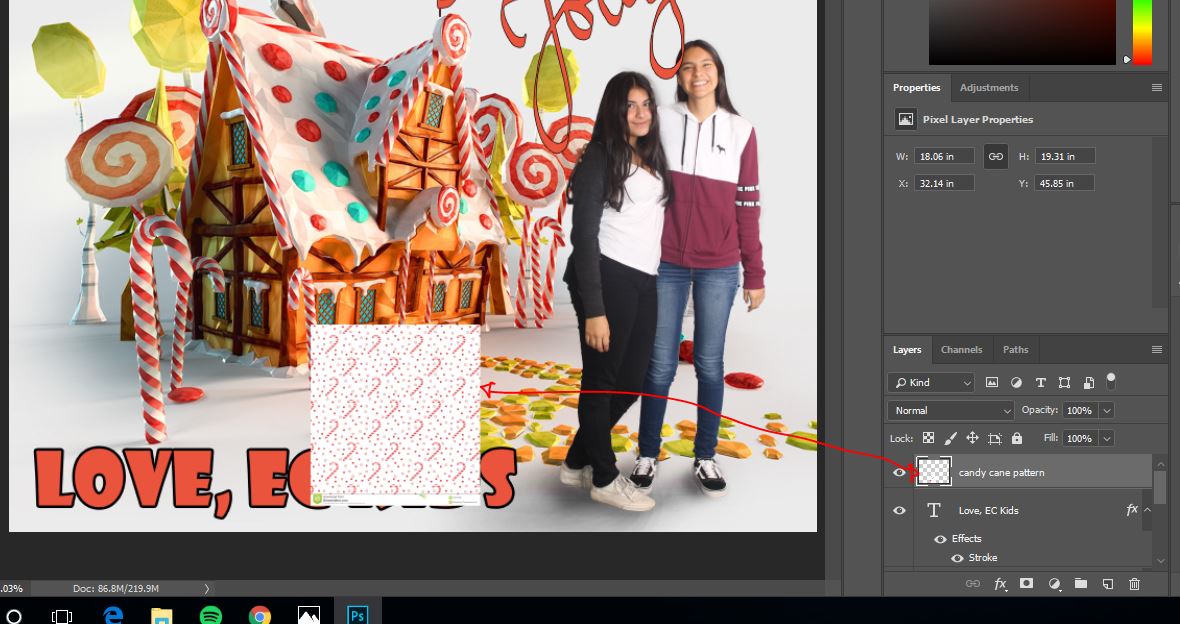
11. Go to google and find a pattern that you would like to use to fill your text. I found a candy cane pattern. Paste it into photoshop
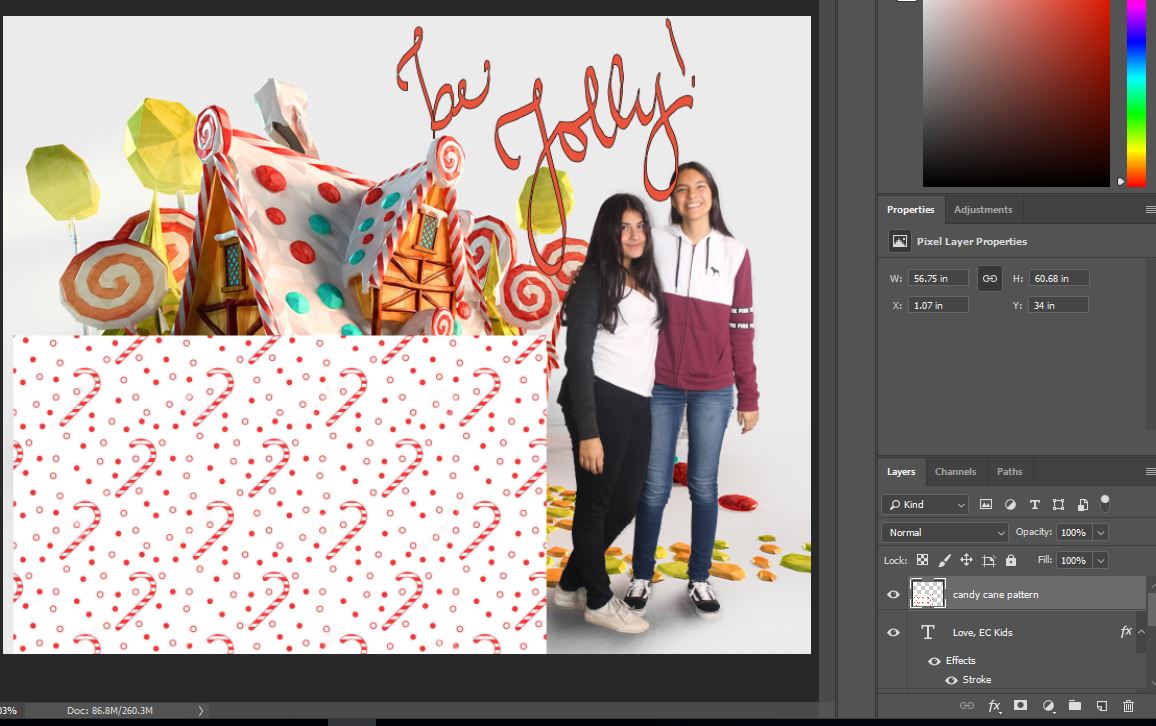
12. Ctrl + T to put your pattern into free transform. Hold shift and stretch from the corners. You want the pattern to completely cover the text.
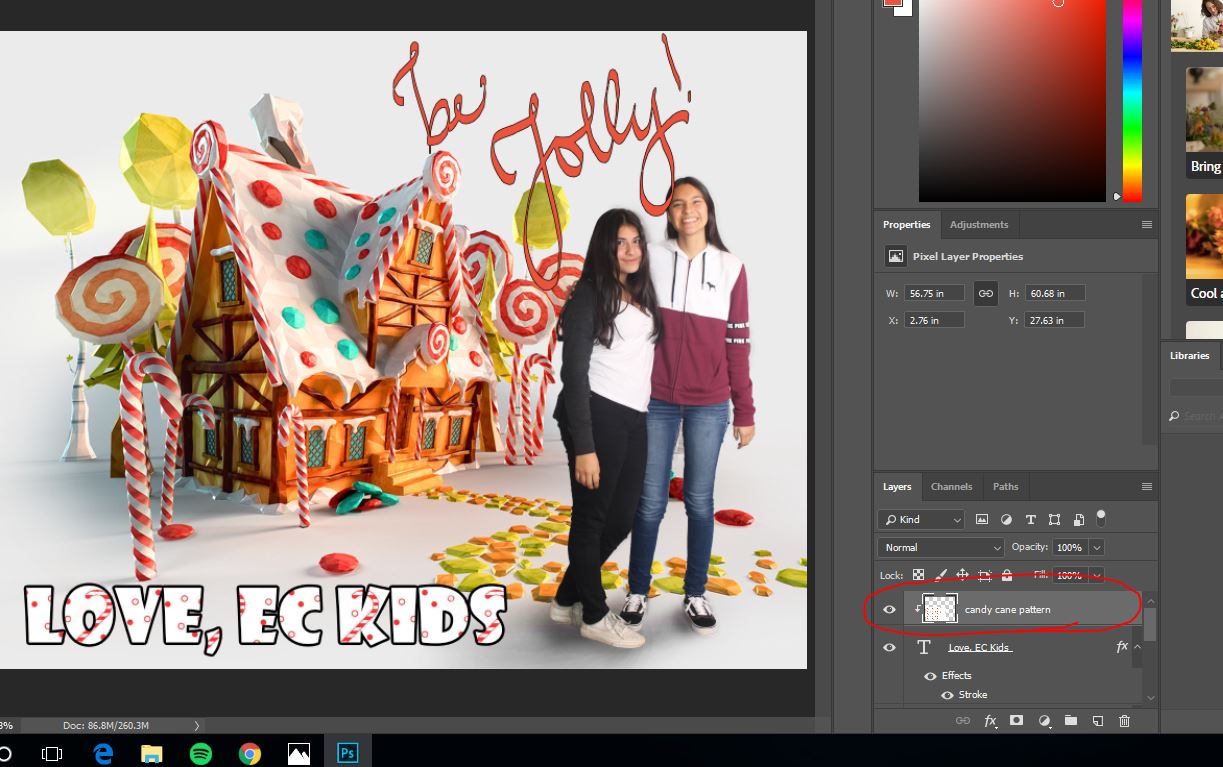
13. Right click on the pattern layer, and click "create clipping mask". It will attach your pattern to your text. You can use your move tool to move around your pattern layer to your preference above the text.
Auto Align Eyes
Objectives:
-download auto 1 & auto 2
-auto align layers to reveal everyone with open eyes
-download auto 1 & auto 2
-auto align layers to reveal everyone with open eyes
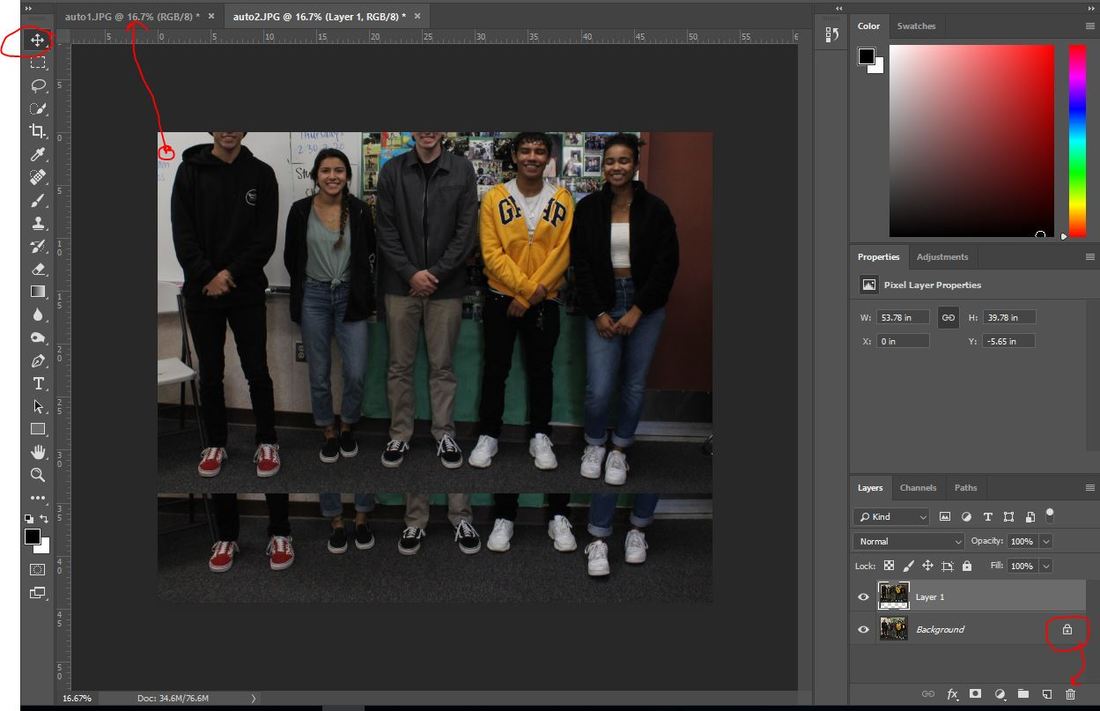
1. Download "auto 1" and "auto 2" from the resources portion on the home page.
2. Open both photos in photoshop and drag photos onto the same tab. (with the move tool, click on photo, without lifting your pen, drag it onto the other layer, and drop on top of photo
3. Delete the lock from the background layer
2. Open both photos in photoshop and drag photos onto the same tab. (with the move tool, click on photo, without lifting your pen, drag it onto the other layer, and drop on top of photo
3. Delete the lock from the background layer
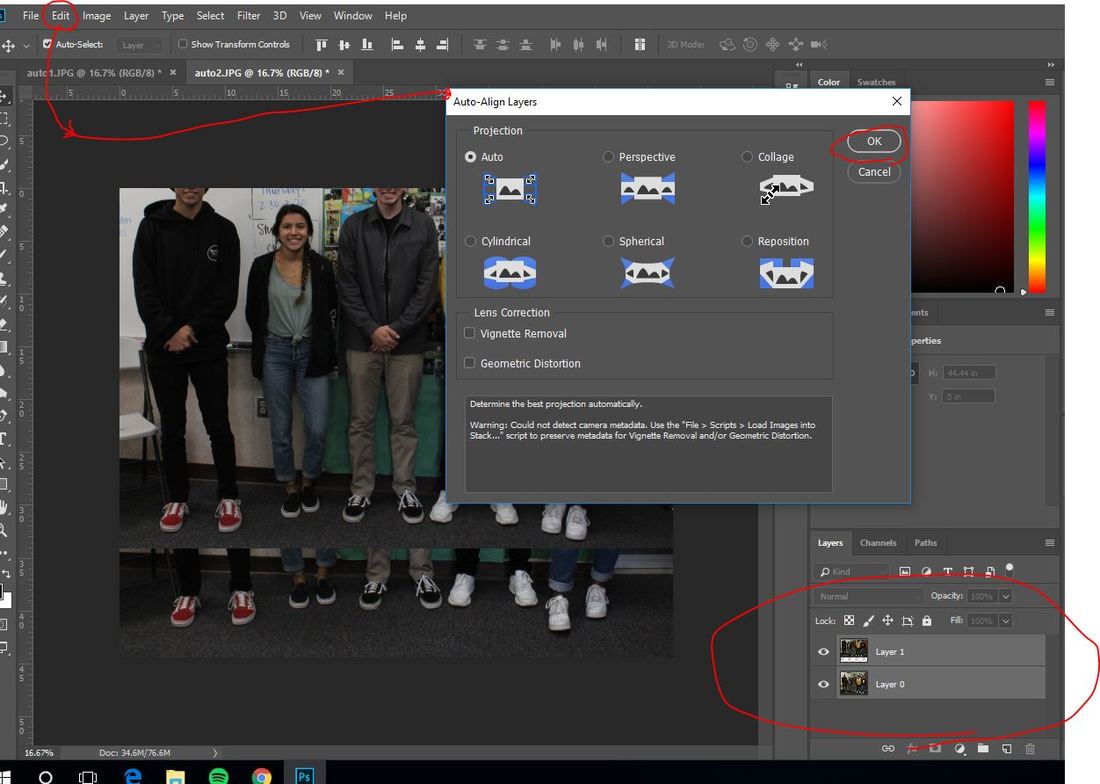
4. Hold Ctrl and click on your other layer, so that they are both highlighted
5. Go to Edit > Auto Align Layers > OK
5. Go to Edit > Auto Align Layers > OK
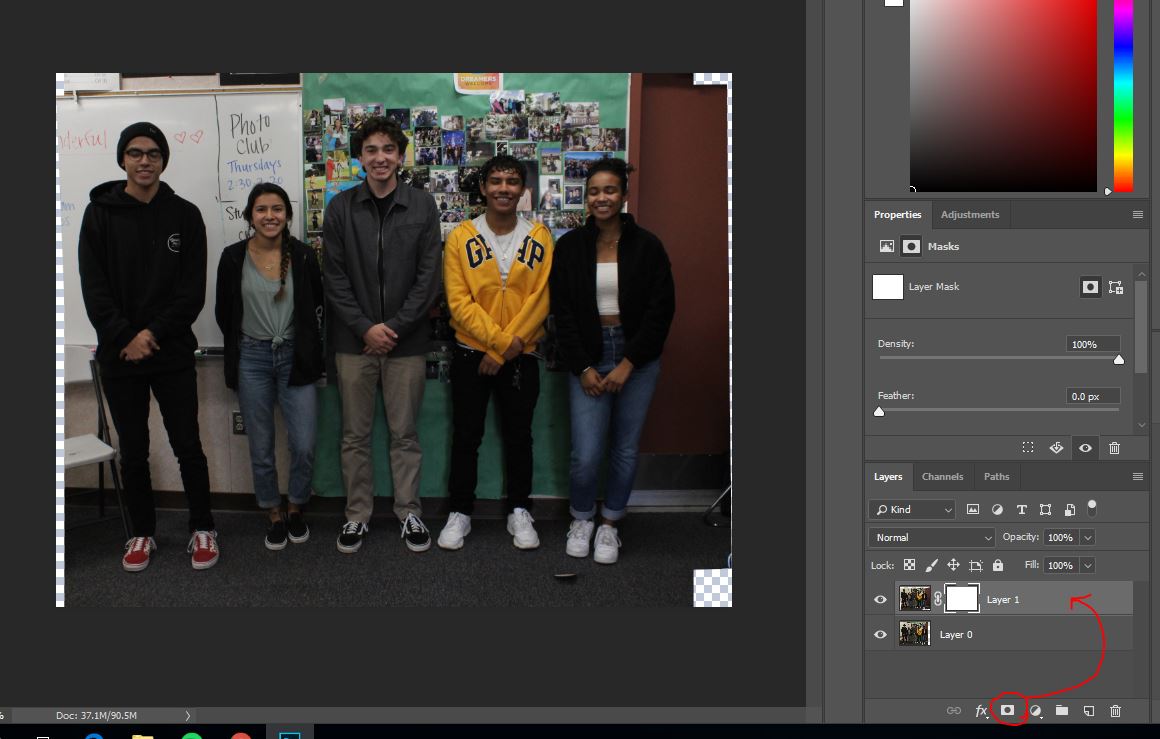
6. Click on the top Layer and add a layer mask
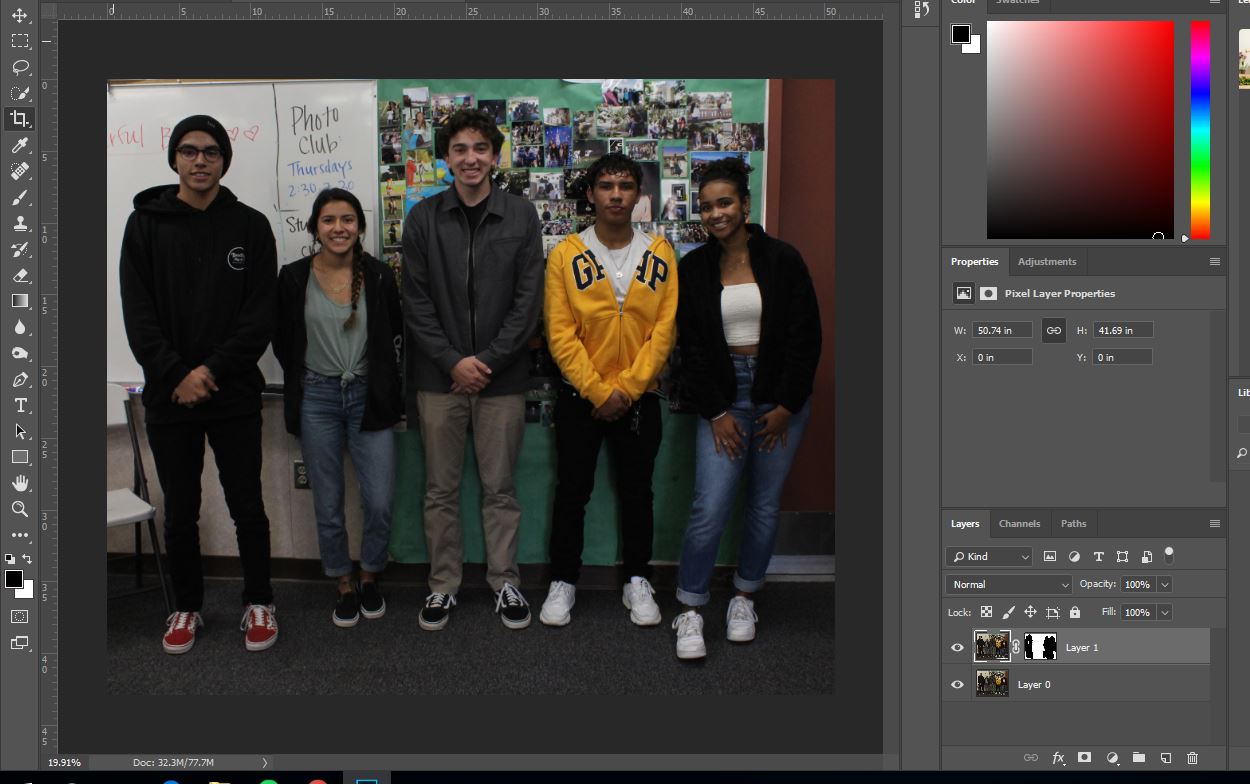
7. Paint black over the models with their eyes blinking. Make sure to change their whole body to make it look natural
Halloween Edits
Objectives:
-Take studio portrait while in costume
-Replace background with google image that matches your costume
-Add in at least one prop to your image.
Objetivos:
-Tomar el retrato de estudio con el traje
-Reemplaza el fondo con la imagen de google que coincida con tu disfraz
. -Agrega al menos un puntal a tu imagen.
1. Fix your levels, then compress your levels by pressing 'ctrl + e'
2. Quick select yourself, then click on "Select and Mask"
3. Refine your edge, make sure that you don't have any of the grey from the studio between hairs or fingers.
4. Jump yourself to your own layer (ctrl + j) Don't forget to label your new layer.
5. Find a background on google that matches your background. MAKE SURE to get a picture that is large enough: in google images, go to tools, size, Larger than 2MP
6. When you find your picture, right click on it and click "open image in new tab", then right click on that picture and click "copy image"
7. Come back in to photo shop, make sure you are clicked on the move tool, and paste your image by using "ctrl + v"
8. Drag the new background layer under the layer with yourself on it.
|
|
9. If you want to show more of the background you brought in, go to image > canvas size and change the width or height to a larger number:
10. Put your new background into free transform (ctrl + t) and make sure to hold shift and stretch from the corner. Press enter when you're finished, and crop if needed.
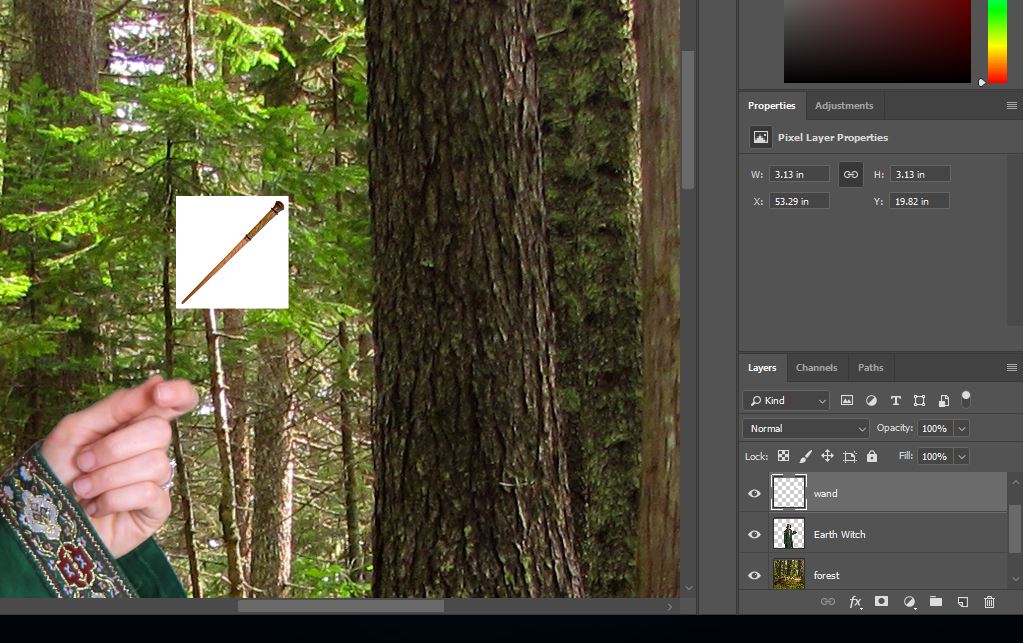
11. Find the prop that you want to add from google. Use the same steps that you used to find your background, to find your prop. I found a wand.
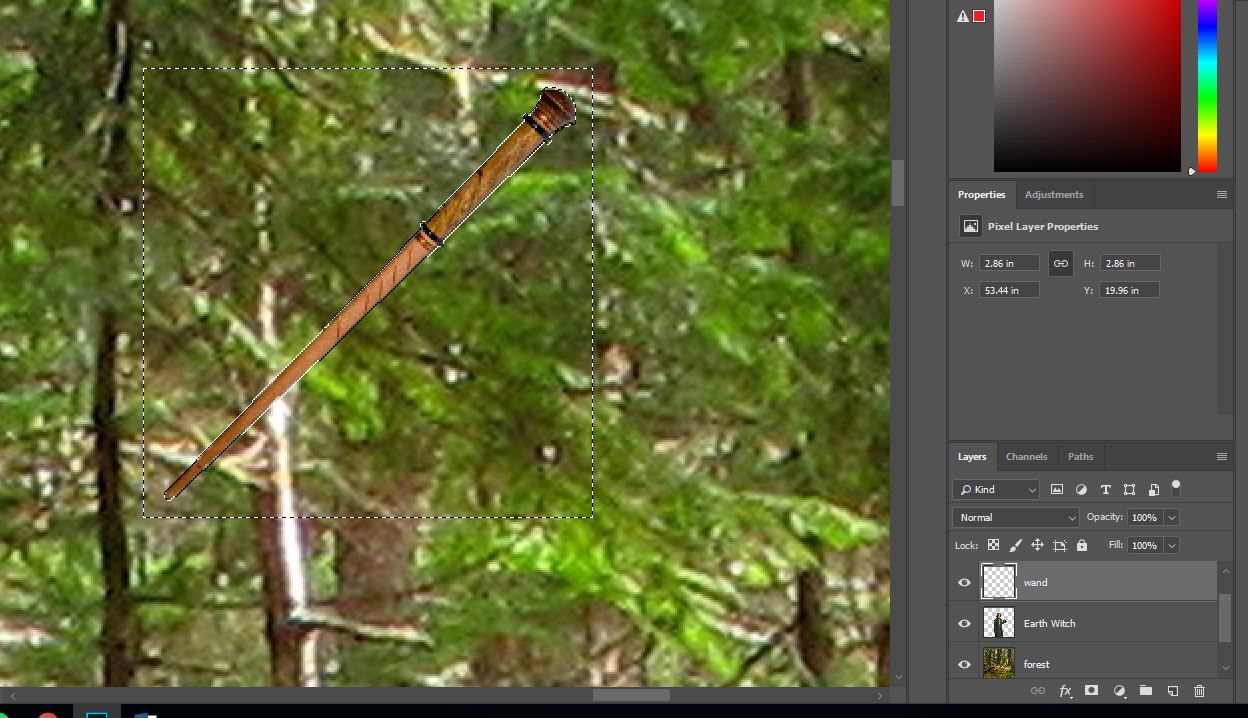
12. Remove the prop from its original background. For mine, I quick selected the white of the background, and then used my eraser tool to quickly erase all the white.
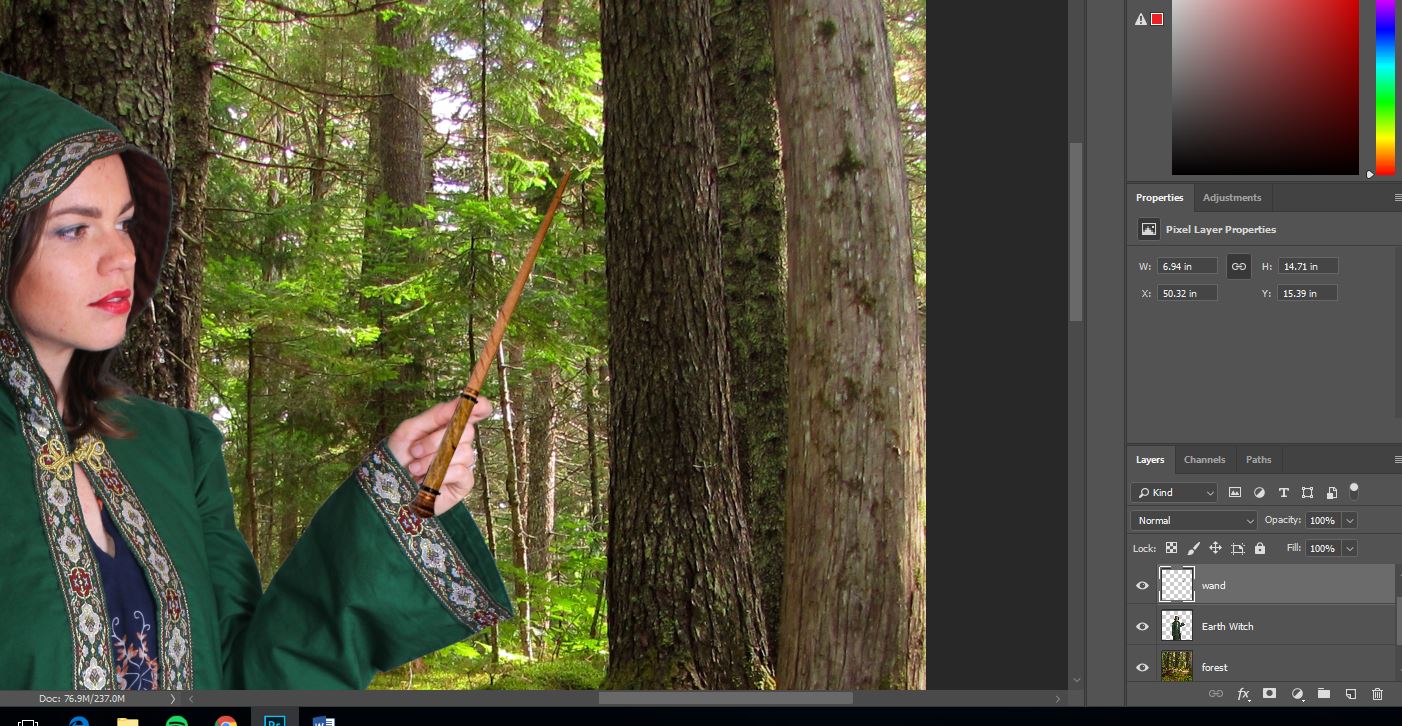
13. Use free transform (ctrl + t) to resize your prop, rotate it, and place it in the correct spot.

14. In order to show through the wand to my fingers, add a layer mask to the wand layer. The layer mask uses the same rule that we've seen earlier on our color balance: WHITE REVEALS BLACK CONCEALS
15. On the layer mask, I used a black brush to hide the wand so that I could see my fingers. If I took too much off, I could use white to bring it back.
15. On the layer mask, I used a black brush to hide the wand so that I could see my fingers. If I took too much off, I could use white to bring it back.
Assignment 6: Portraits
Objectives:
-3 Studio Portraits (from shoulders up)
-Basic edits applied to all (levels, spot healing brush, dodge/burn)
-3 Seperate edits on each photo. First photo= "s curve". Second photo = "S Curve" + Black and White. Third Photo= Colorize
Objetivos:
-3 Retratos de estudio (desde los hombros hacia arriba)
-Ediciones básicas aplicadas a todos (niveles, pincel de curación de manchas, esquivar / quemar)
-3 Ediciones separadas en cada foto. Primera foto = "curva s". Segunda foto = "Curva S" + Blanco y Negro. Tercera foto = Colorear
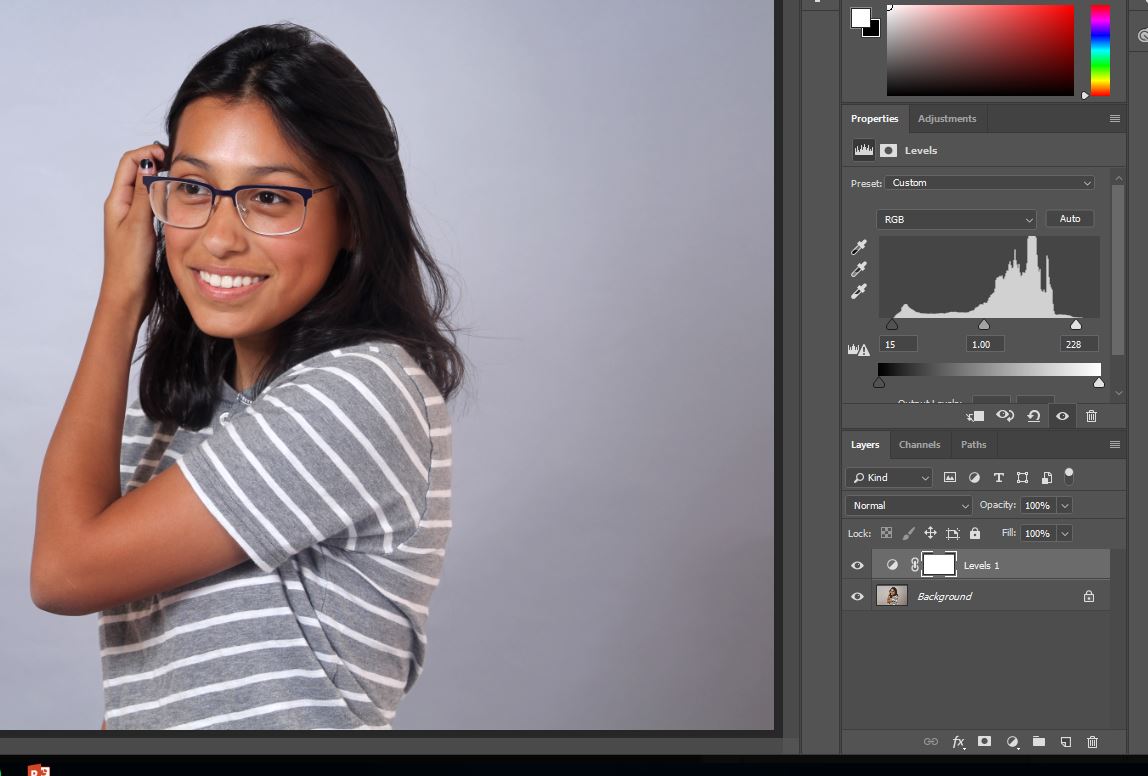
1. Apply Basic Edits To all Photos.:
a. Fix Levels
1. Aplicar ediciones básicas a todas las fotos:
a. Niveles fijos
a. Fix Levels
1. Aplicar ediciones básicas a todas las fotos:
a. Niveles fijos
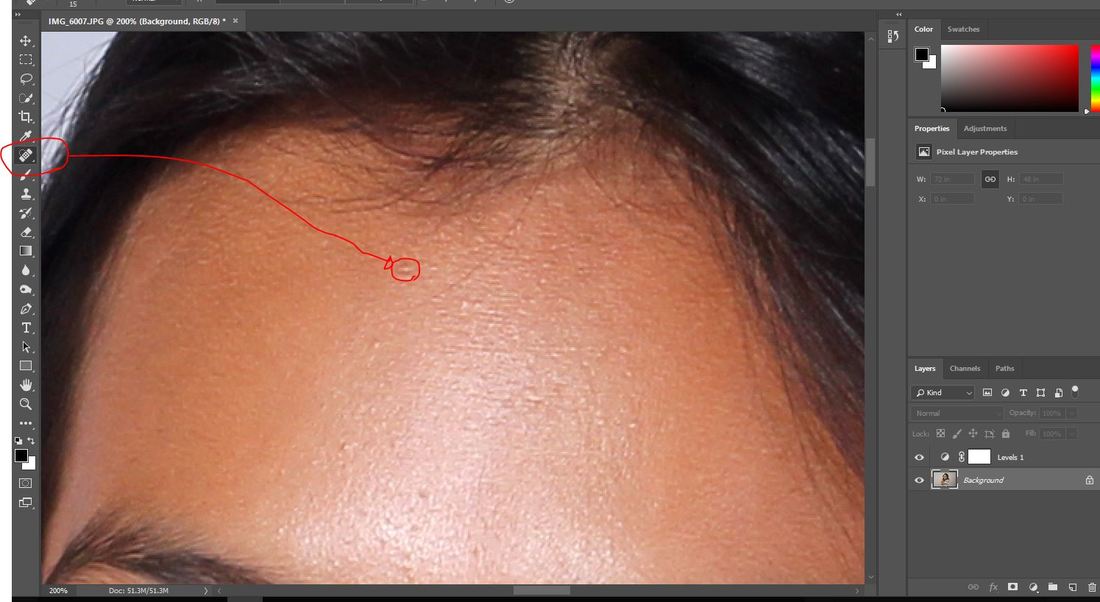
b. Use the spot healing brush to fix up any blemishes (as needed). Use a small brush and fix blemishes one at a time. Do not get rid of birth marks or freckles.
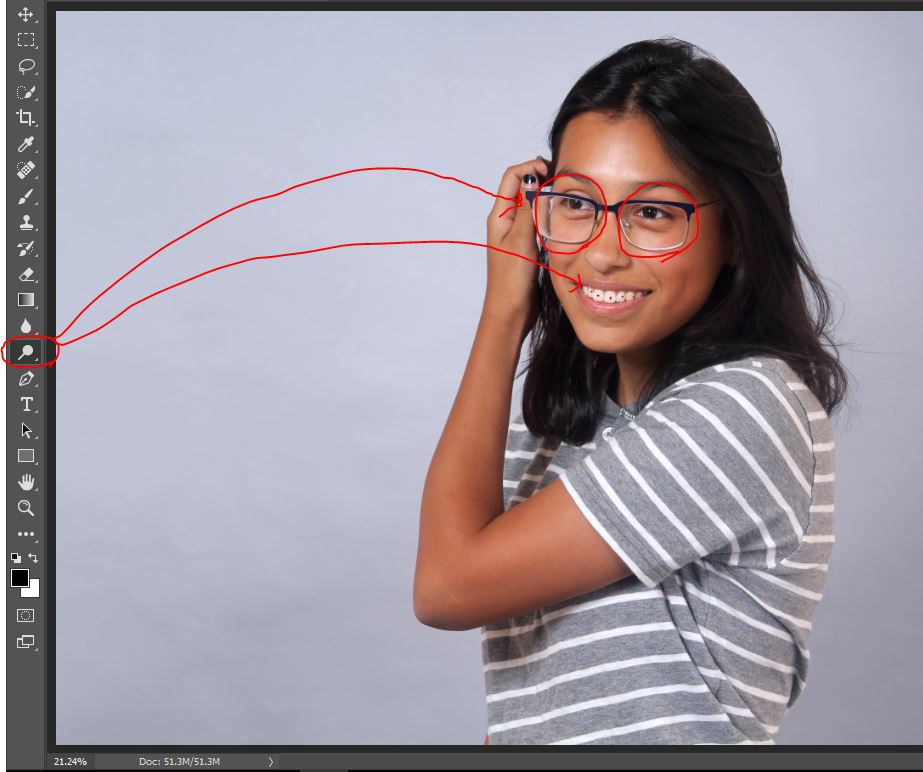
c. Use the Dodge tool to brighten the entire eye socket and individual teeth (as needed)

d. Use the burn tool to burn along shadows along the sides of the face, under the cheeks, and under the chin.
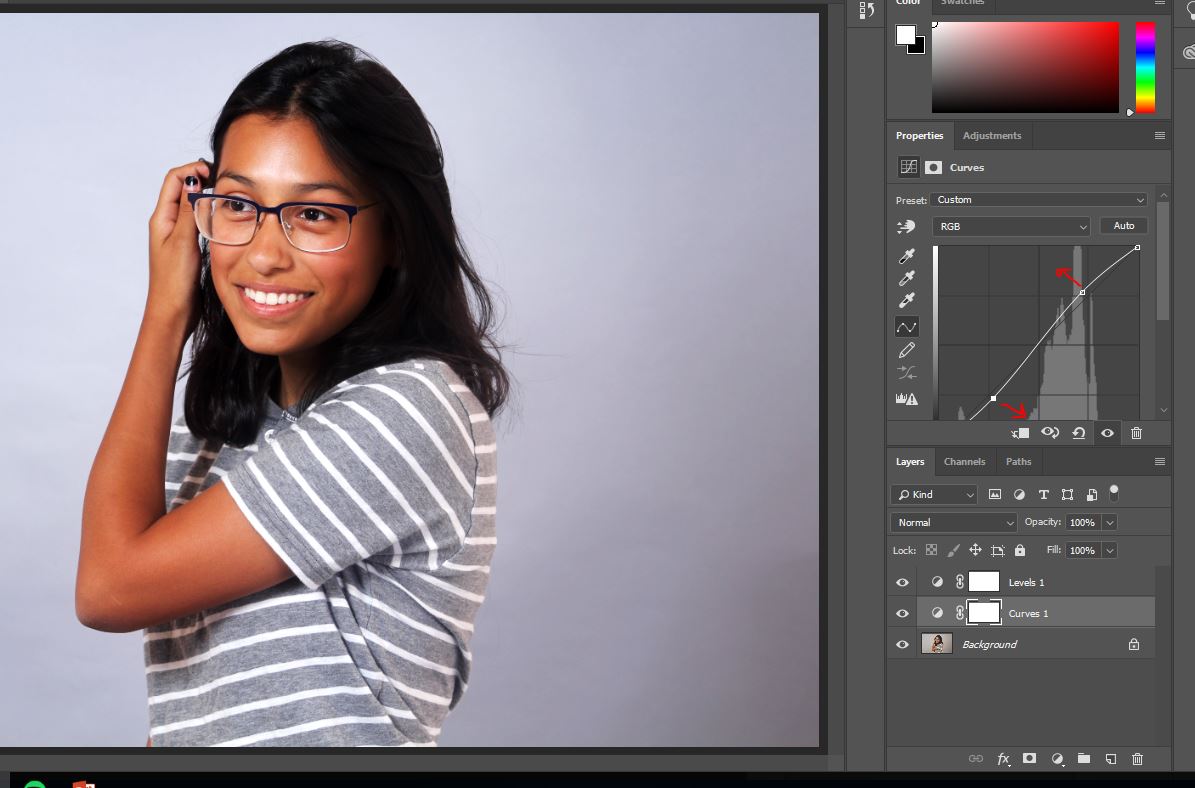
*********************EDIT ONE*******************
1. Go to cookie > Curves to make the "s curve". This is a way to be in control of the contrast you add. Along the line, click the top area where the four squares intersect and raise it according to what you feel looks good. Then, click the bottom intersecting boxes area and lower it. This should create the curves of an "S" on your graph. If you go too far up and down, it will make your model's skin look orange.
1. Go to cookie > Curves to make the "s curve". This is a way to be in control of the contrast you add. Along the line, click the top area where the four squares intersect and raise it according to what you feel looks good. Then, click the bottom intersecting boxes area and lower it. This should create the curves of an "S" on your graph. If you go too far up and down, it will make your model's skin look orange.
*********************EDIT TWO*******************
1. Don't forget to do the basic edits to all photos.
2. Add the "s curve" again for this edit.
3. Go to Cooke>Levels and choose black and white. I also chose to add a vignette to this photo by burning the edges
1. Don't forget to do the basic edits to all photos.
2. Add the "s curve" again for this edit.
3. Go to Cooke>Levels and choose black and white. I also chose to add a vignette to this photo by burning the edges
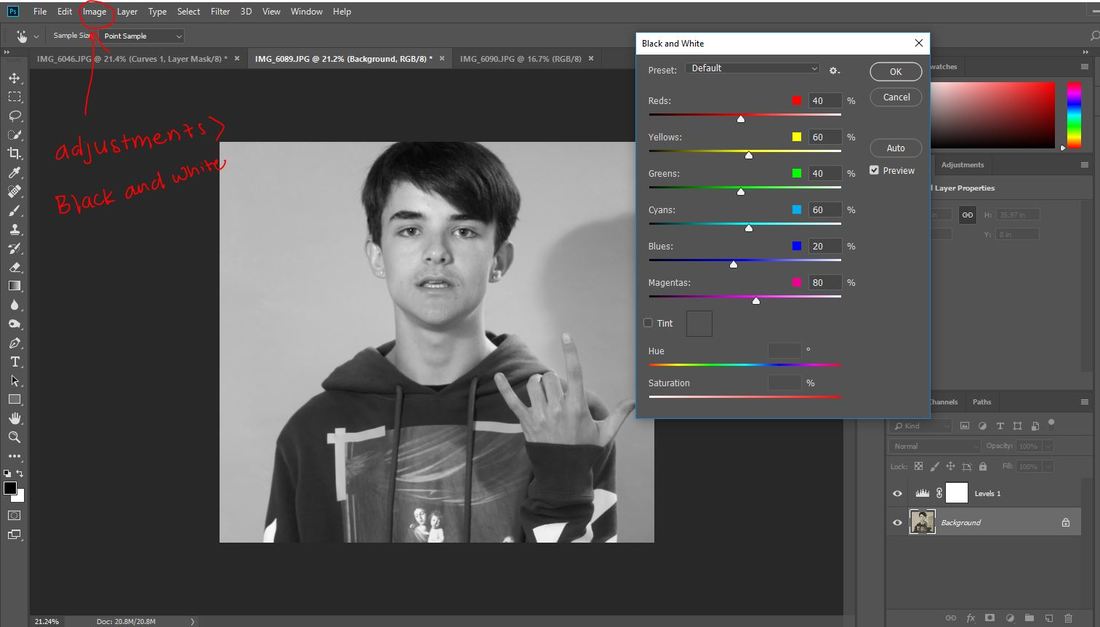
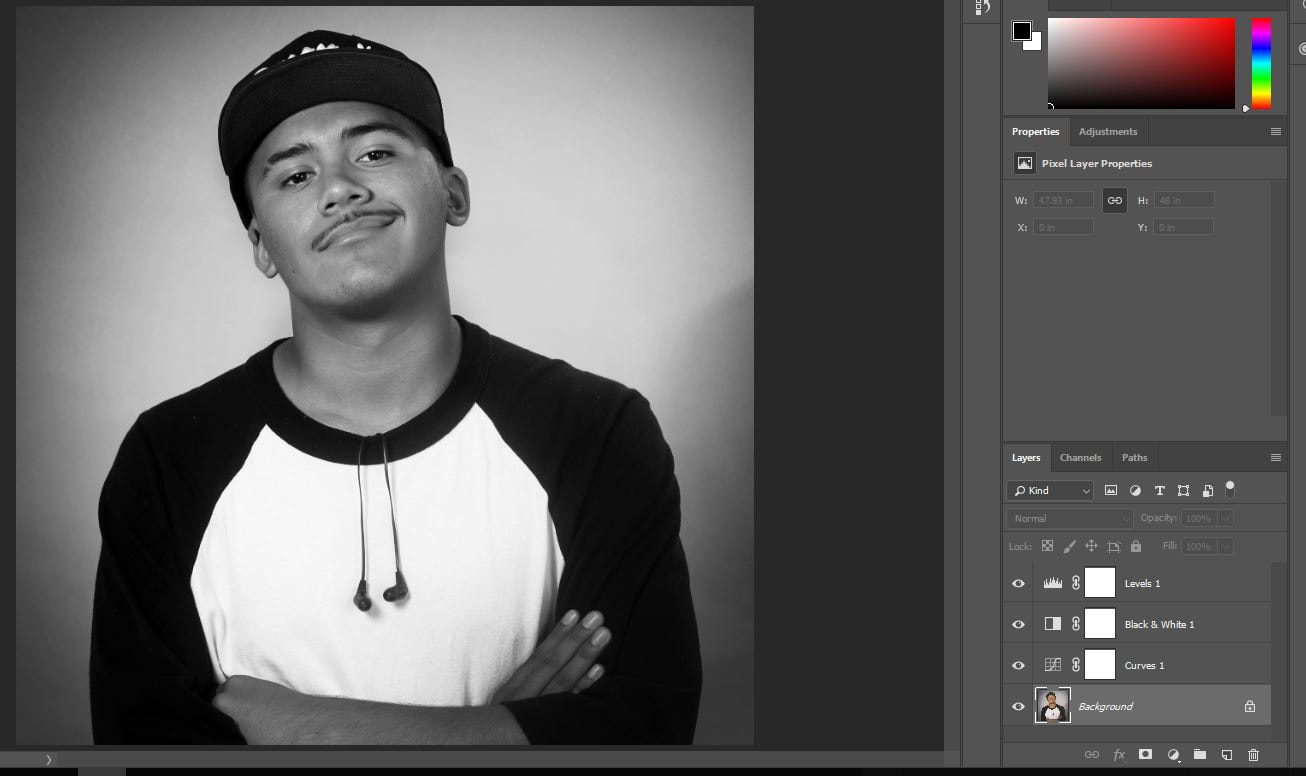
*********************EDIT THREE*******************
1. Fix your levels
2.PERMANENTLY change your pixels to black and white by going to Image > Adjustments > Black and White > OK
1. Arregla tus niveles.
2. Cambie PERMANENTEMENTE sus píxeles a blanco y negro yendo a Imagen> Ajustes> Blanco y negro> Aceptar
1. Fix your levels
2.PERMANENTLY change your pixels to black and white by going to Image > Adjustments > Black and White > OK
1. Arregla tus niveles.
2. Cambie PERMANENTEMENTE sus píxeles a blanco y negro yendo a Imagen> Ajustes> Blanco y negro> Aceptar

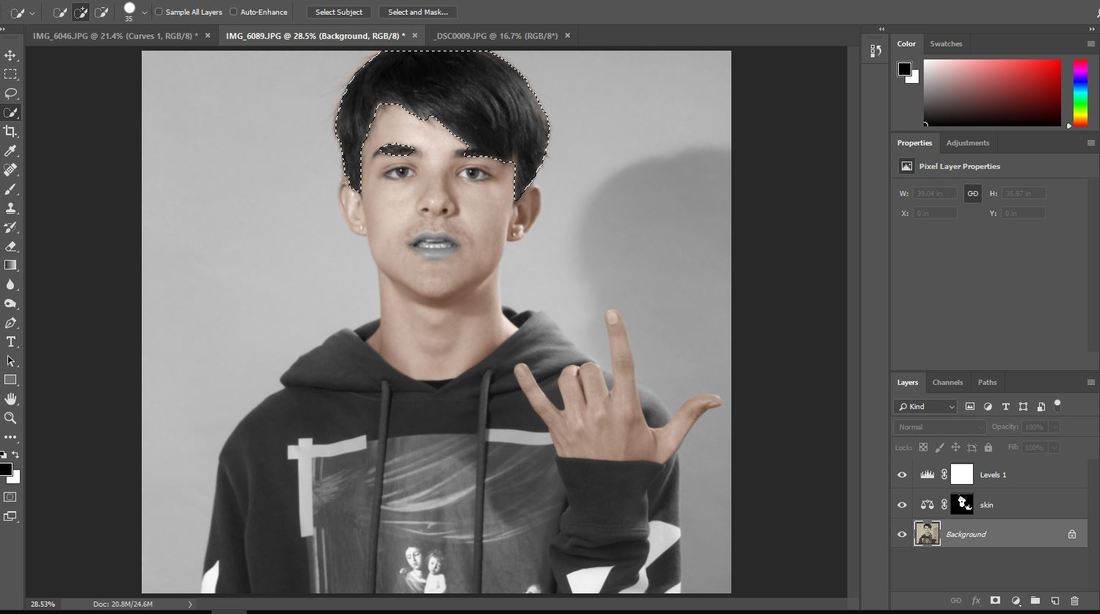
3. Use the quick select tool to select the skin of your model. Hold Alt to subtract from your selection. Subtract eyebrows, mouth, eyes from your skin selection.
4. Press the "Select and Mask" button once you have made your selection. We use this tool to refine our edges.
3. Use la herramienta de selección rápida para seleccionar el aspecto de su modelo. Mantenga presionada la tecla Alt para restar de su selección. Resta las cejas, la boca, los ojos de tu selección de piel.
4. Presione el botón "Seleccionar y enmascarar" una vez que haya hecho su selección. Usamos esta herramienta para refinar nuestros bordes.
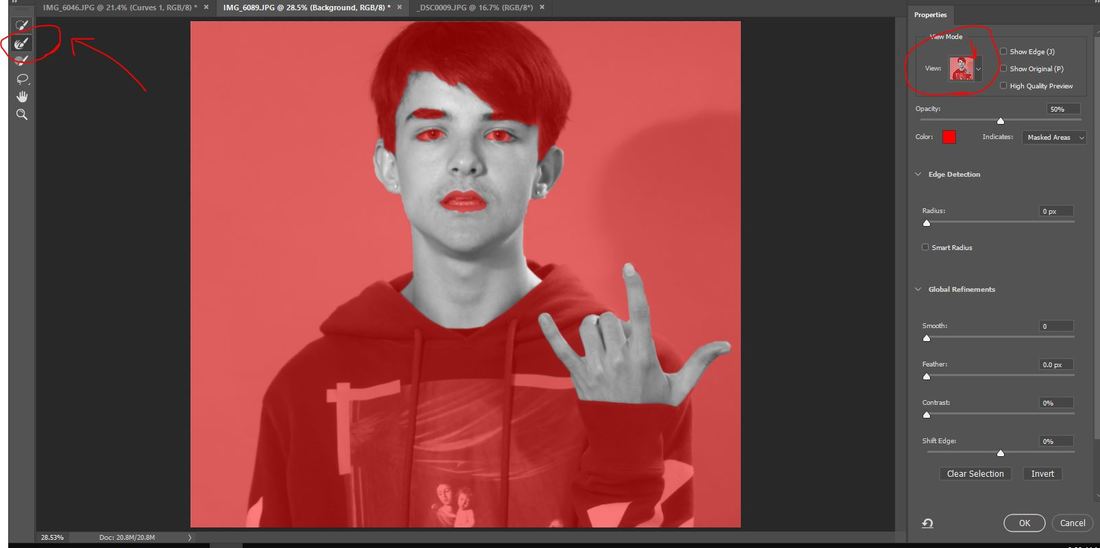
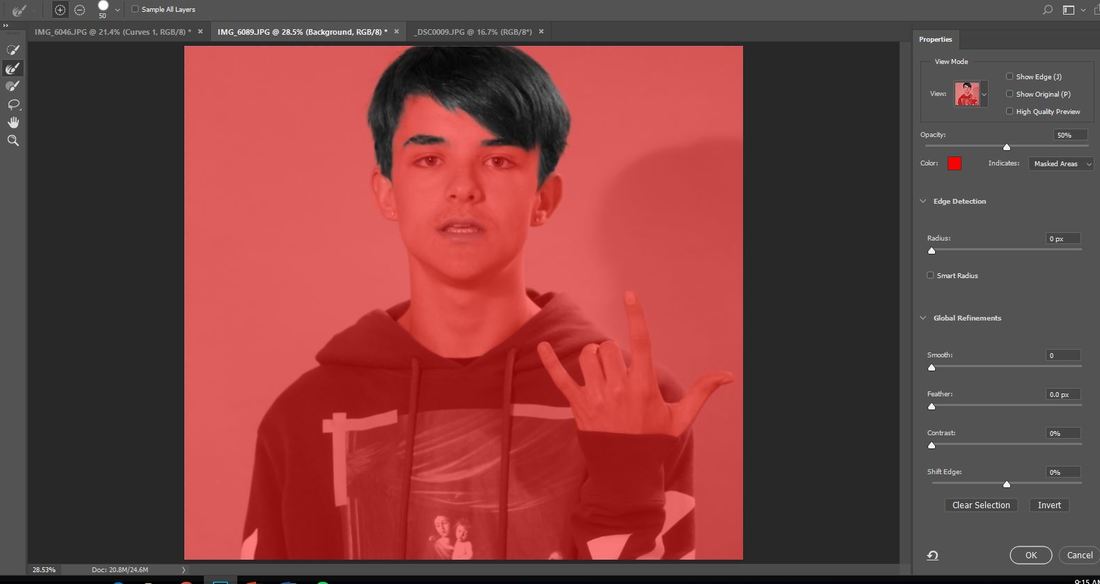
5. Change the view to overlay to see what is in selection.
6. Use the Refine Edge tool on the left side toolbar (second from the top) to trace around hair and eyebrows, or any other edges that need to become more refined.
5. Cambie la vista a superposición para ver qué hay en la selección.
6. Use la herramienta Refinar borde en la barra de herramientas del lado izquierdo (segundo desde la parte superior) para trazar alrededor del cabello y las cejas, o cualquier otro borde que necesite ser más refinado.
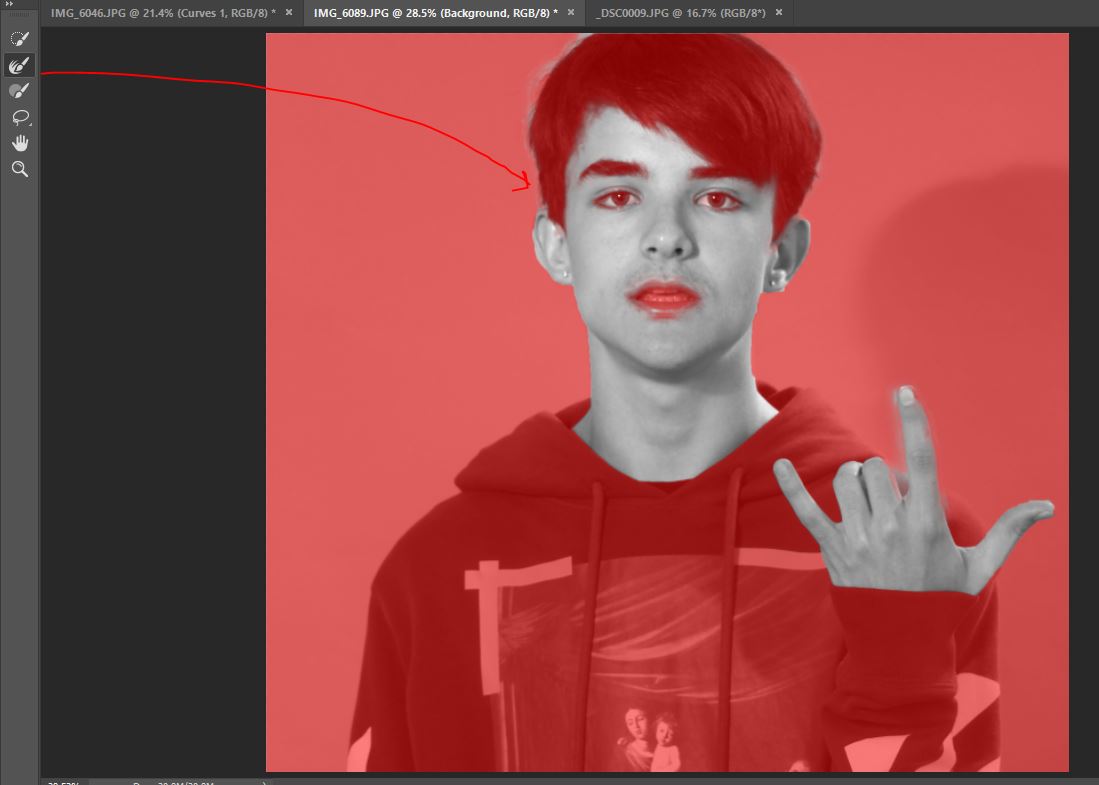
7. After you refine your edges, press "OK". If you lose your selection, you can use the first tool on the left to bring it back.
7. Después de refinar sus bordes, presione "OK". Si pierde su selección, puede usar la primera herramienta de la izquierda para recuperarla.
7. Después de refinar sus bordes, presione "OK". Si pierde su selección, puede usar la primera herramienta de la izquierda para recuperarla.
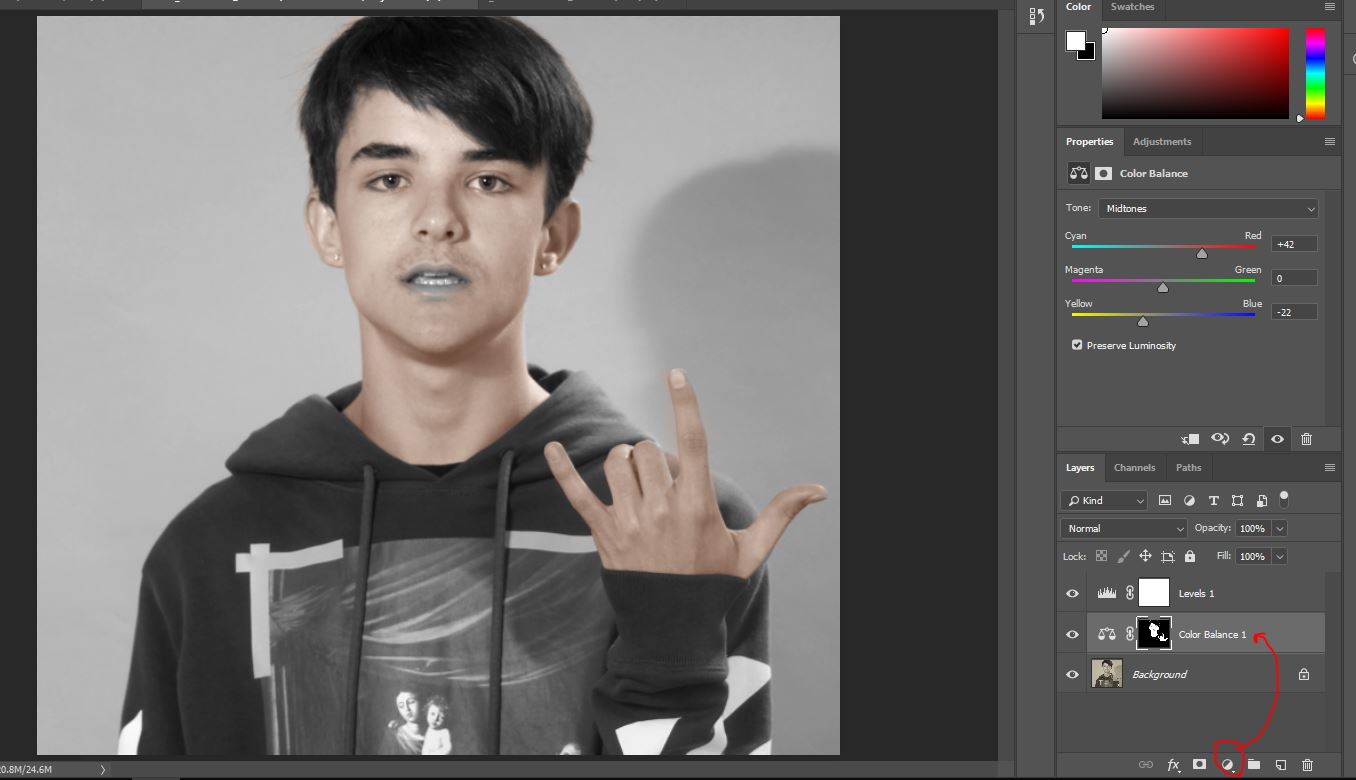
8. Go to Cookie > Color Balance. Move the colors around to try and match the skin tone of your model. It will not look exactly right, because there are many different color changes in different areas of the face. However, you will be using warm colors (red, magenta, yellow) to match skin colors.
8. Vaya a Cookie> Balance de color. Mueve los colores para tratar de igualar el tono de piel de tu modelo. No se verá exactamente correcto, porque hay muchos cambios de color diferentes en diferentes áreas de la cara. Sin embargo, utilizará colores cálidos (rojo, magenta, amarillo) para combinar los colores de la piel.
8. Vaya a Cookie> Balance de color. Mueve los colores para tratar de igualar el tono de piel de tu modelo. No se verá exactamente correcto, porque hay muchos cambios de color diferentes en diferentes áreas de la cara. Sin embargo, utilizará colores cálidos (rojo, magenta, amarillo) para combinar los colores de la piel.
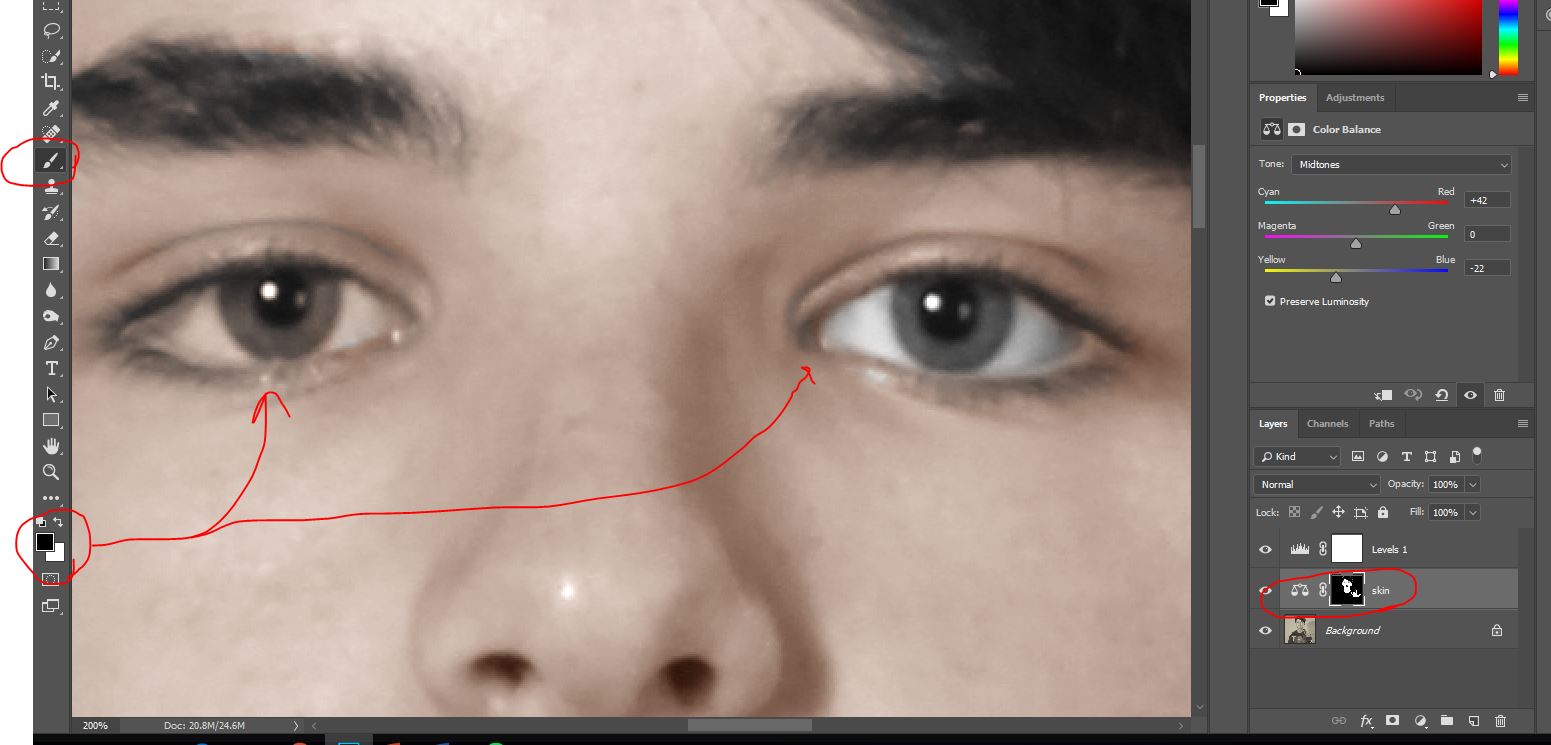
9. Go in and fix any selection mistakes that were made. If there is extra skin color where it shouldn't be, use a black brush to conceal the color balance. If there is an area of skin that was missed, use a white brush to reveal the color balance. Make sure to label your layer "skin"
*TIP* Use 'x' to switch between black and white
9. Entra y corrige cualquier error de selección que se haya cometido. Si hay un color de piel adicional donde no debería estar, use un pincel negro para ocultar el balance de color. Si hay un área de la piel que se perdió, use un pincel blanco para revelar el balance de color. Asegúrate de etiquetar tu capa "piel"
* CONSEJO * Usa 'x' para cambiar entre blanco y negro
10. Once you have finished, go back to the background layer and use quick select to select hair and eyebrows
10. Una vez que haya terminado, vuelva a la capa de fondo y use la selección rápida para seleccionar el cabello y las cejas
10. Una vez que haya terminado, vuelva a la capa de fondo y use la selección rápida para seleccionar el cabello y las cejas
11. Go In to "Select and Mask" again to refine the edge on the hair and make sure that you collect all the baby hairs and eyebrows in your selection.
11. Vaya a "Seleccionar y enmascarar" nuevamente para refinar el borde del cabello y asegurarse de que recoge todos los pelos y cejas del bebé en su selección.
11. Vaya a "Seleccionar y enmascarar" nuevamente para refinar el borde del cabello y asegurarse de que recoge todos los pelos y cejas del bebé en su selección.
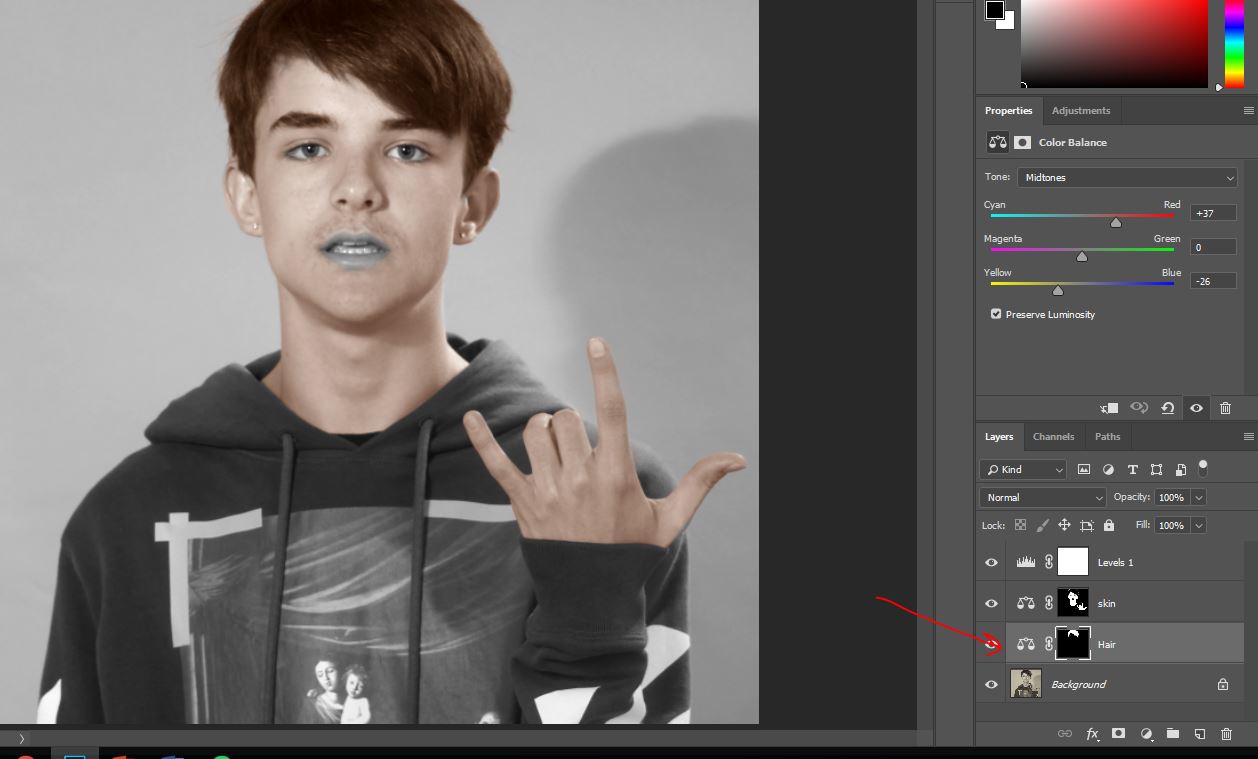
12. Change the colors to match your model's hair. Don't forget to label the layer. Use the white brush to reveal the color balance, and a black brush to conceal the color balance.
12. Cambia los colores para que coincida con el cabello de tu modelo. No te olvides de etiquetar la capa. Use el pincel blanco para revelar el balance de color y un pincel negro para ocultar el balance de color.
12. Cambia los colores para que coincida con el cabello de tu modelo. No te olvides de etiquetar la capa. Use el pincel blanco para revelar el balance de color y un pincel negro para ocultar el balance de color.
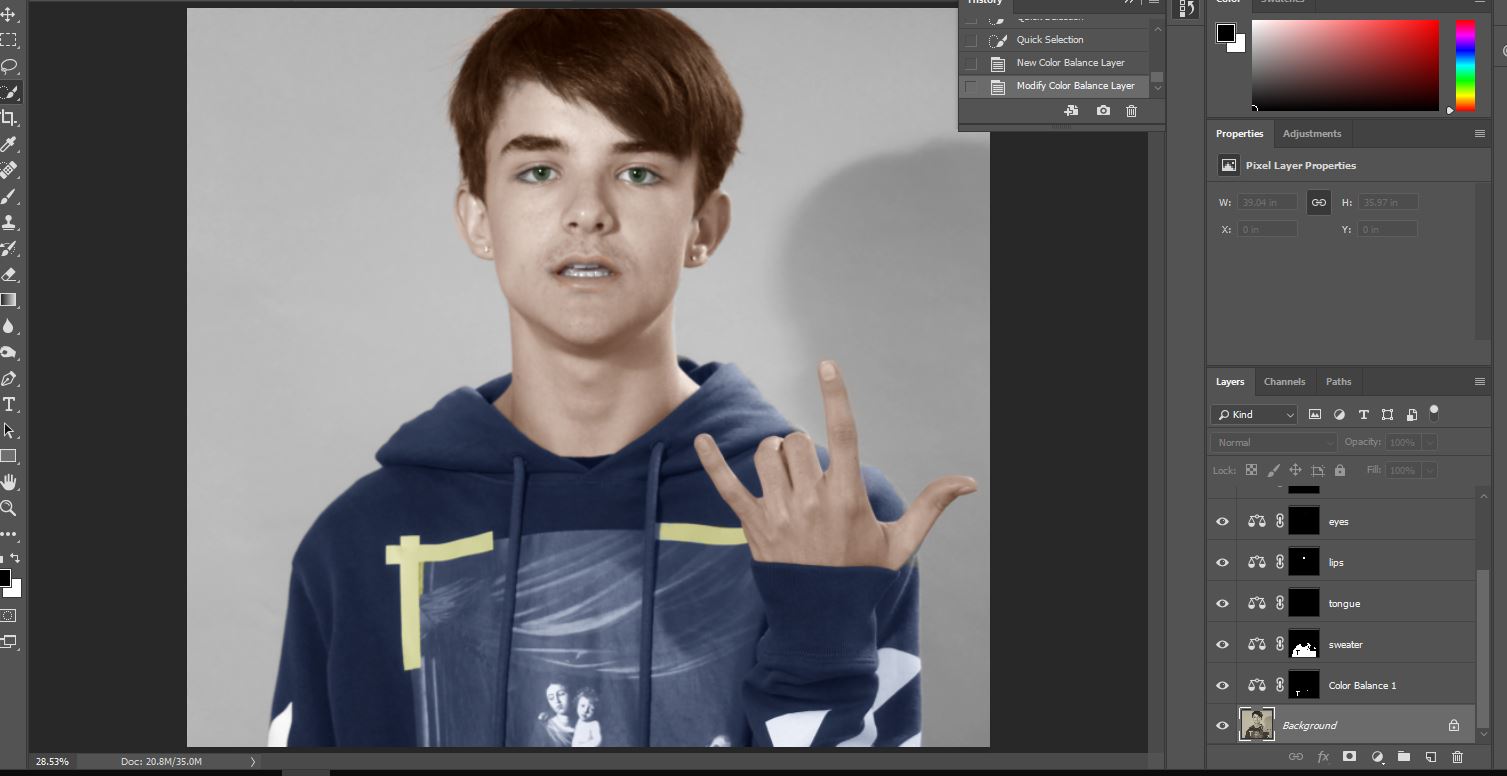
13. Repeat these steps to color in each color change. You need to have a layer for at least skin, hair, eyes, lips, and shirt. This should take a while to accomplish.
13. Repita estos pasos para colorear cada cambio de color. Necesitas tener una capa para al menos piel, cabello, ojos, labios y camisa. Esto debería tomar un tiempo para lograrlo.
13. Repita estos pasos para colorear cada cambio de color. Necesitas tener una capa para al menos piel, cabello, ojos, labios y camisa. Esto debería tomar un tiempo para lograrlo.
Assignment 5: Framed
Objectives
-3 photos with a framed focal point
-1 edit: high saturation, low vibrance
-1 edit: low saturation, high vibrance
-1 free edit
Los objetivos
-3 fotos con un punto focal enmarcado.
-1 edición: alta saturación, baja vibración
-1 edición: baja saturación, alta vibración
-1 edición gratuita
-3 photos with a framed focal point
-1 edit: high saturation, low vibrance
-1 edit: low saturation, high vibrance
-1 free edit
Los objetivos
-3 fotos con un punto focal enmarcado.
-1 edición: alta saturación, baja vibración
-1 edición: baja saturación, alta vibración
-1 edición gratuita
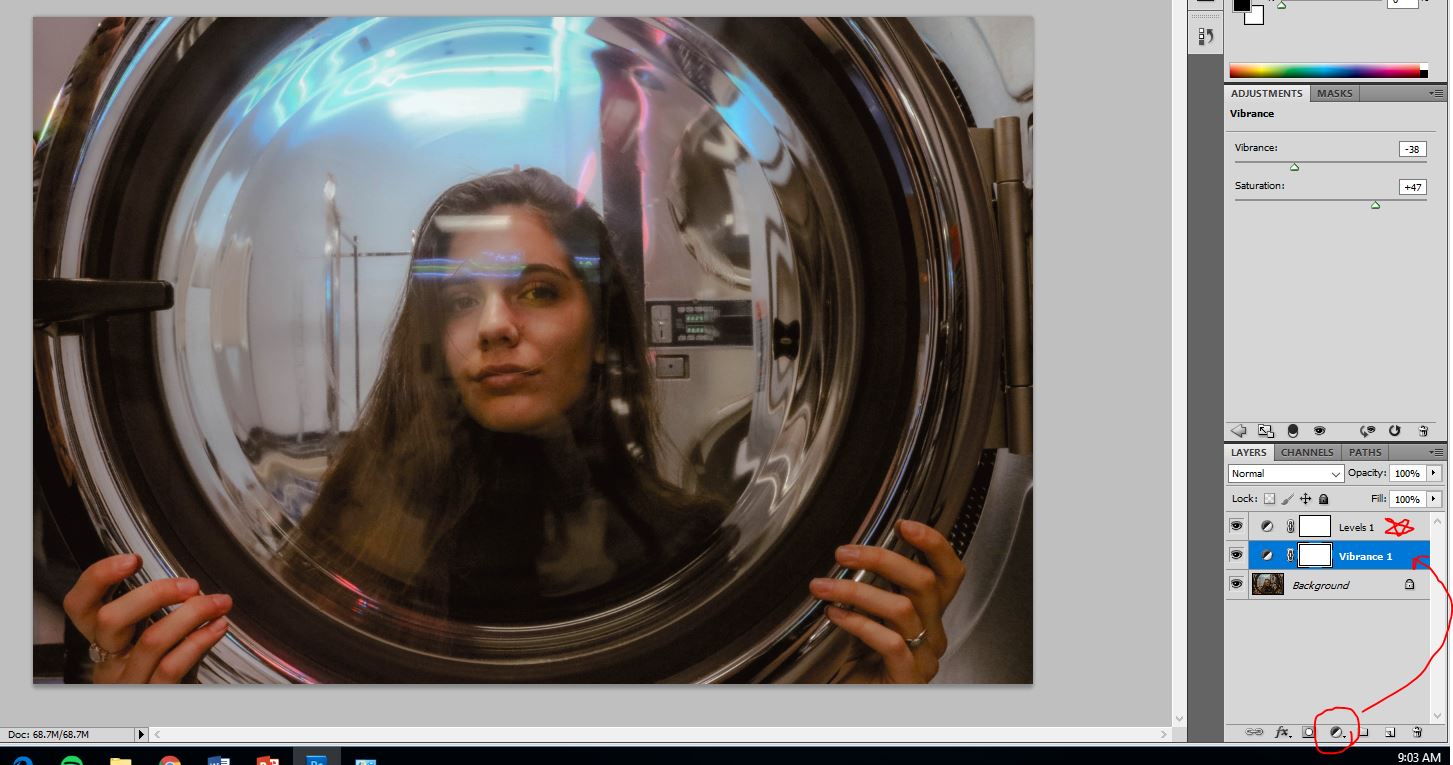
1. Fix Levels
2. Open cookie > Vibrance
3. Lower your vibrance and raise your saturation. You can choose the amount based on your own photo and preference.
4. That concludes the first edit, so open another photo. Repeat steps 1-3, but use high vibrance and low saturation.
5. Your last edit is a free edit, you can choose what you would like to do based tools you have already learned.
1. Niveles fijos
2. Abrir cookie> Vibrance
3. Baje su vibración y aumente su saturación. Puede elegir la cantidad según su propia foto y preferencia
. 4. Con esto concluye la primera edición, abre otra foto. Repita los pasos 1-3, pero use una alta intensidad y baja saturación.
5. Su última edición es una edición gratuita, puede elegir lo que le gustaría hacer en base a las herramientas que ya ha aprendido.
Assignment 4: Leading Lines
Objectives:
-5 photos with leading lines, leading our eye to the focal point
-Edits using dodge and burn
Objetivos:
-5 fotos con líneas iniciales, dirigiendo nuestro ojo al punto focal
-Edita esquivar y quemar.
-5 photos with leading lines, leading our eye to the focal point
-Edits using dodge and burn
Objetivos:
-5 fotos con líneas iniciales, dirigiendo nuestro ojo al punto focal
-Edita esquivar y quemar.
1. First thing, always fix your levels. I had a gap in the shadows section that I closed.
1. Lo primero, siempre arregla tus niveles. Tuve un hueco en la sección de sombras que cerré.
1. Lo primero, siempre arregla tus niveles. Tuve un hueco en la sección de sombras que cerré.
2. Make sure that you're on you background layer to make changes. I used the dodge tool (brighten an area) to brighten my focal point.
2. Asegúrate de estar en la capa de fondo para realizar cambios. Utilicé la herramienta de esquivar (iluminar un área) para iluminar mi punto focal.
2. Asegúrate de estar en la capa de fondo para realizar cambios. Utilicé la herramienta de esquivar (iluminar un área) para iluminar mi punto focal.
3. I used the burn tool do darken everything but the focal point. You can be creative with what you dodge and burn, but try to stay away from a brush that is too small. Changing large, general areas tends to work the best.
3. Utilicé la herramienta de quemado para oscurecer todo menos el punto focal. Puede ser creativo con lo que esquiva y quema, pero trate de mantenerse alejado de un cepillo demasiado pequeño. Cambiar grandes áreas generales tiende a funcionar mejor.
3. Utilicé la herramienta de quemado para oscurecer todo menos el punto focal. Puede ser creativo con lo que esquiva y quema, pero trate de mantenerse alejado de un cepillo demasiado pequeño. Cambiar grandes áreas generales tiende a funcionar mejor.
Assignment 3: Rule of Thirds
Objectives:
-3 photos, with the emphasis (focal point) falling within the rule of thirds
-Set mood within each photo
-Mood emphasized with black, white, and blur vignette
Objetivos:
-3 fotos, con el énfasis (punto focal) dentro de la regla de los tercios
-Configurar el estado de ánimo dentro de cada foto.
-Mood destacó con una viñeta negra, blanca y borrosa
1. When you open a photo, FIX LEVELS.
2. Crop your photo to make sure that your focal point falls within the rule of thirds, using the grid.
1. Cuando abre una foto, REVISE LOS NIVELES.
2. Recorta tu foto para asegurarte de que tu punto focal esté dentro de la regla de los tercios, usando la cuadrícula.
2. Crop your photo to make sure that your focal point falls within the rule of thirds, using the grid.
1. Cuando abre una foto, REVISE LOS NIVELES.
2. Recorta tu foto para asegurarte de que tu punto focal esté dentro de la regla de los tercios, usando la cuadrícula.
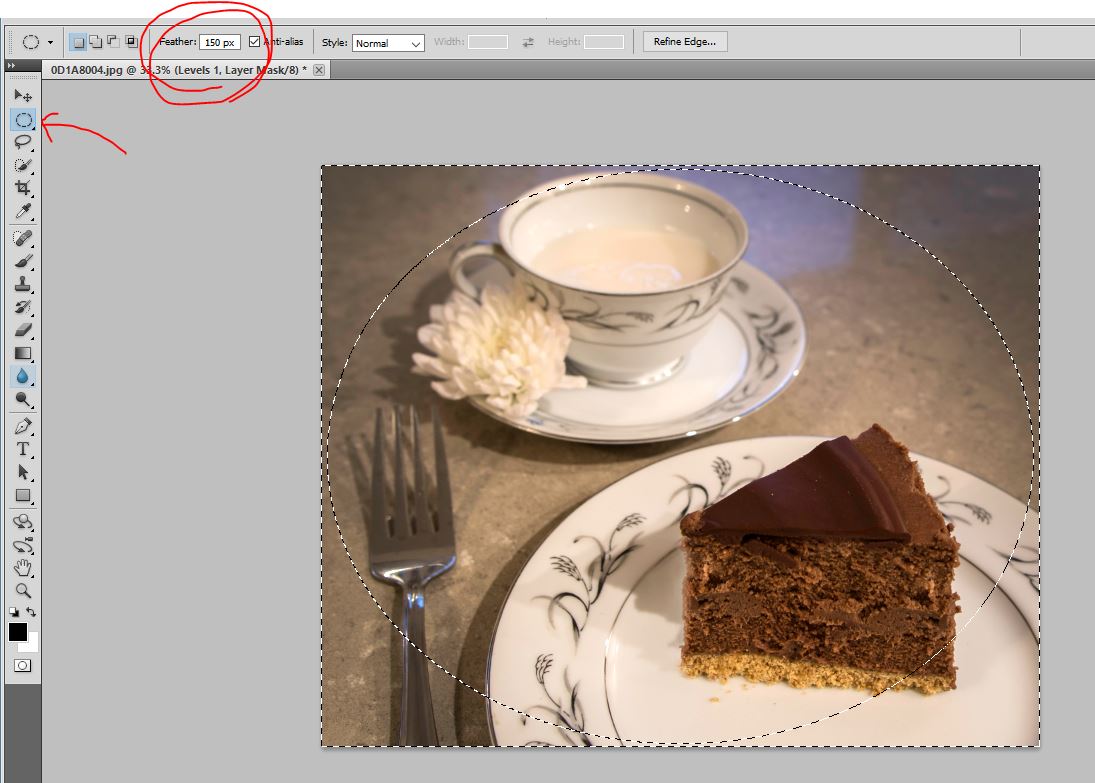
2. Click on the elliptical marquee tool (The one we used for the sphere)
3. At the top, CHANGE THE FEATHER TO 150 PX BEFORE you stretch the oval from one corner of your picture to the other end.
4. Go to the top and click select > inverse (shortcut: shift + ctrl + i)
2. Haga clic en la herramienta de marquesina elíptica (la que usamos para la esfera)
3. En la parte superior, CAMBIE LA PLUMA A 150 PX ANTES DE estirar el óvalo desde una esquina de su imagen hasta el otro extremo.
4. Vaya a la parte superior y haga clic en select> inverse (acceso directo: shift + ctrl + i)
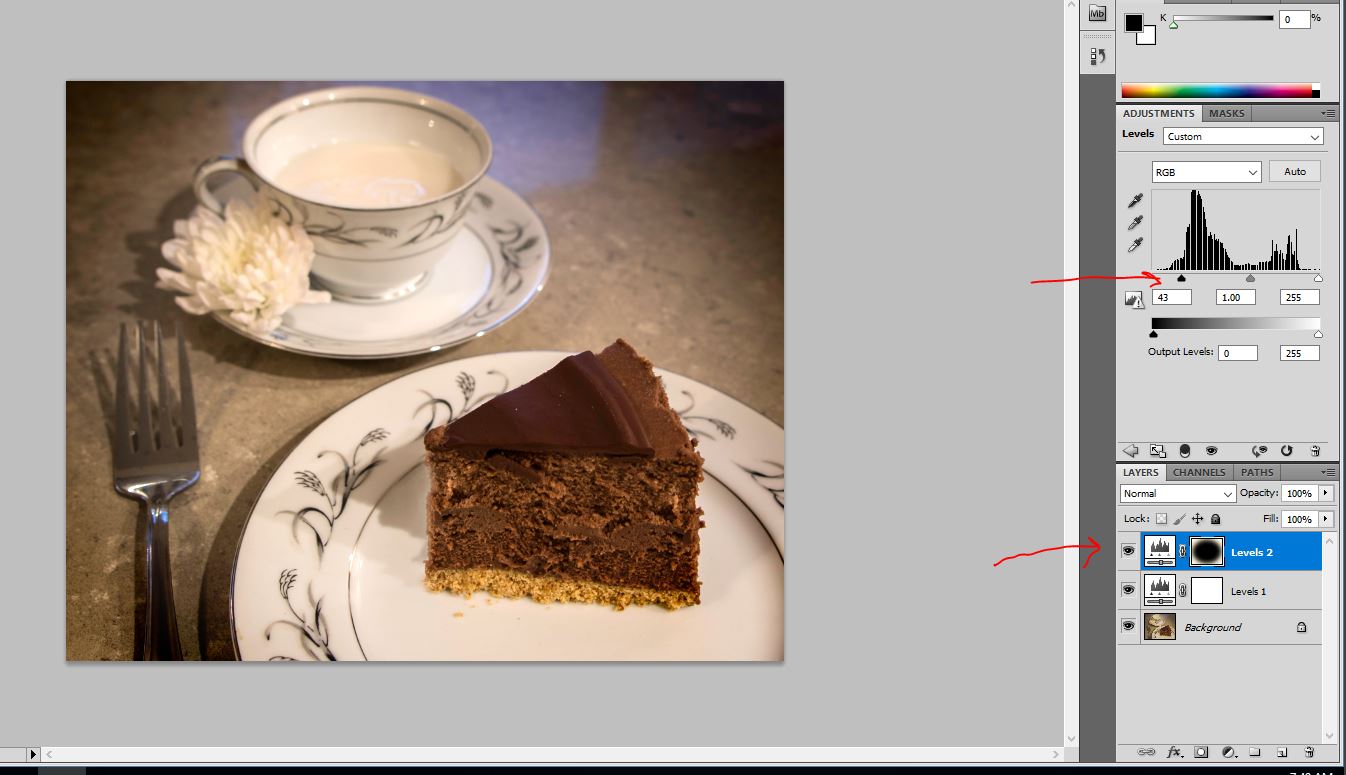
5. Click cookie > levels.
6. To make a black vignette, move the shadows arrow to the left. Be subtle, we definitely don't want a photo with too harsh of a vignette
7. On a seperate picture, repeat the same steps, but move the highlights to the right in order to make a white vignette.
5. Haga clic en cookie> levels.
6. Para hacer una viñeta negra, mueva la flecha de sombras hacia la izquierda.
7. En una imagen separada, repita los mismos pasos, pero mueva los resaltados hacia la derecha para hacer una viñeta blanca.
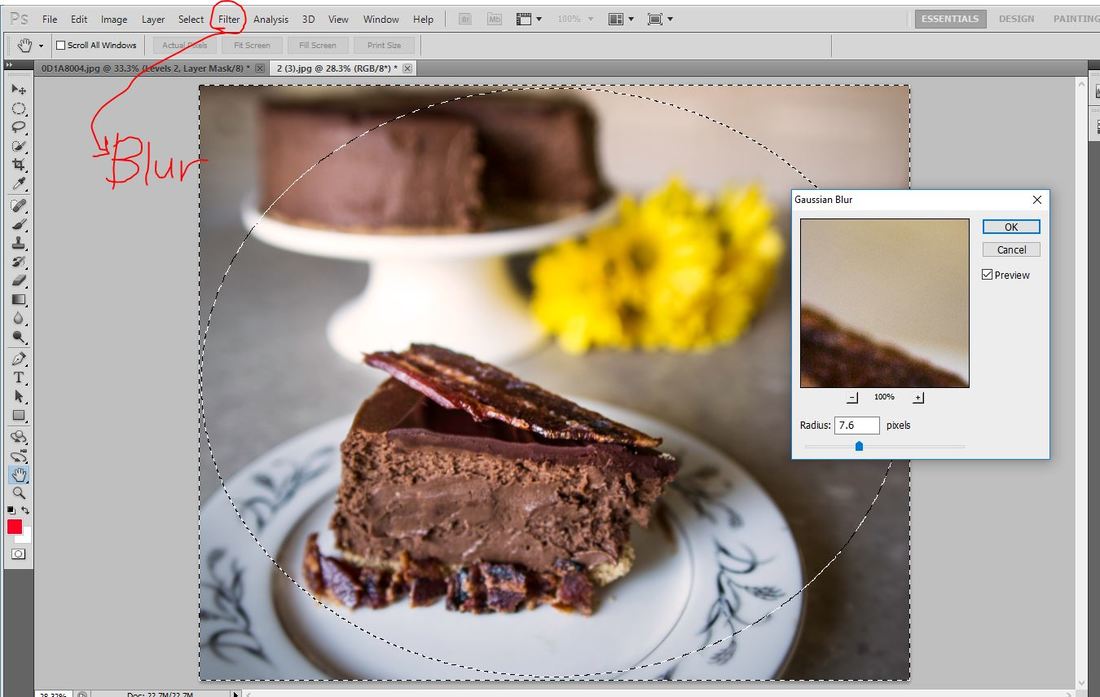
8. To create the blur vignette, follow steps 1-4.
9. Make sure you get back onto your background layer
10. Go to Filter > Blur > Gaussian Blur. You will get a pop up box where you can change the radius of the blur. Choose an amount that suits your photo.
8. Para crear la viñeta de desenfoque, siga los pasos 1-4.
9. Vaya a Filter> Blur> Desenfoque gaussiano. Obtendrá un cuadro emergente donde puede cambiar el radio del desenfoque. Elija una cantidad que se adapte a su foto
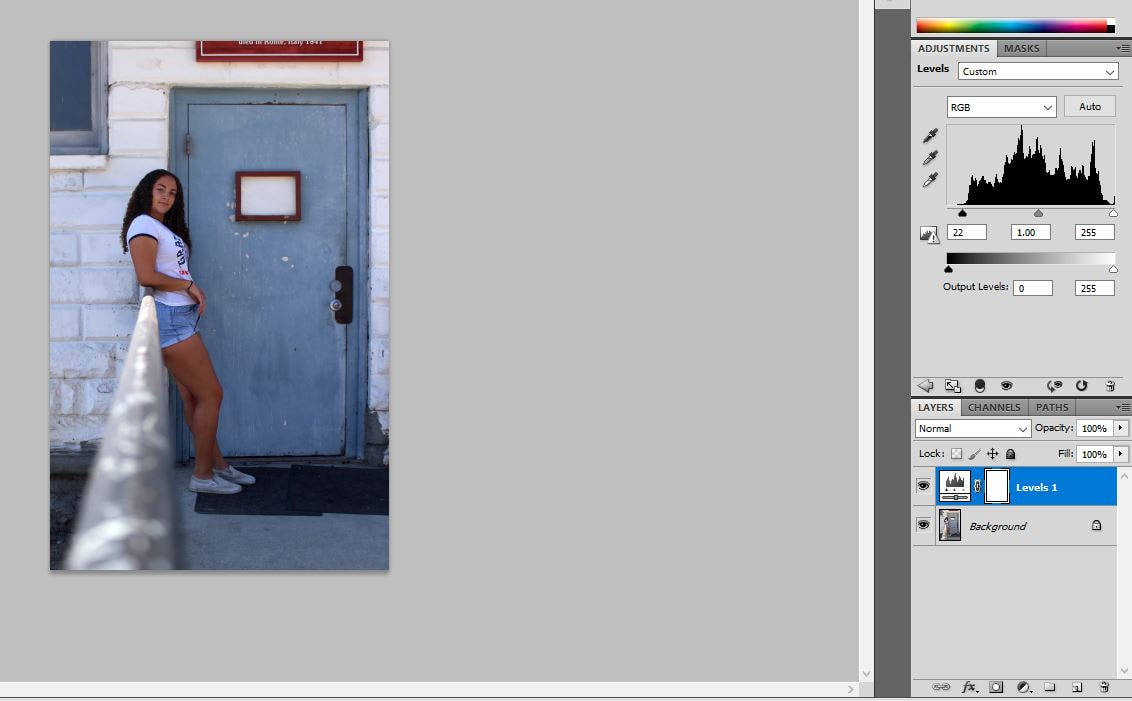
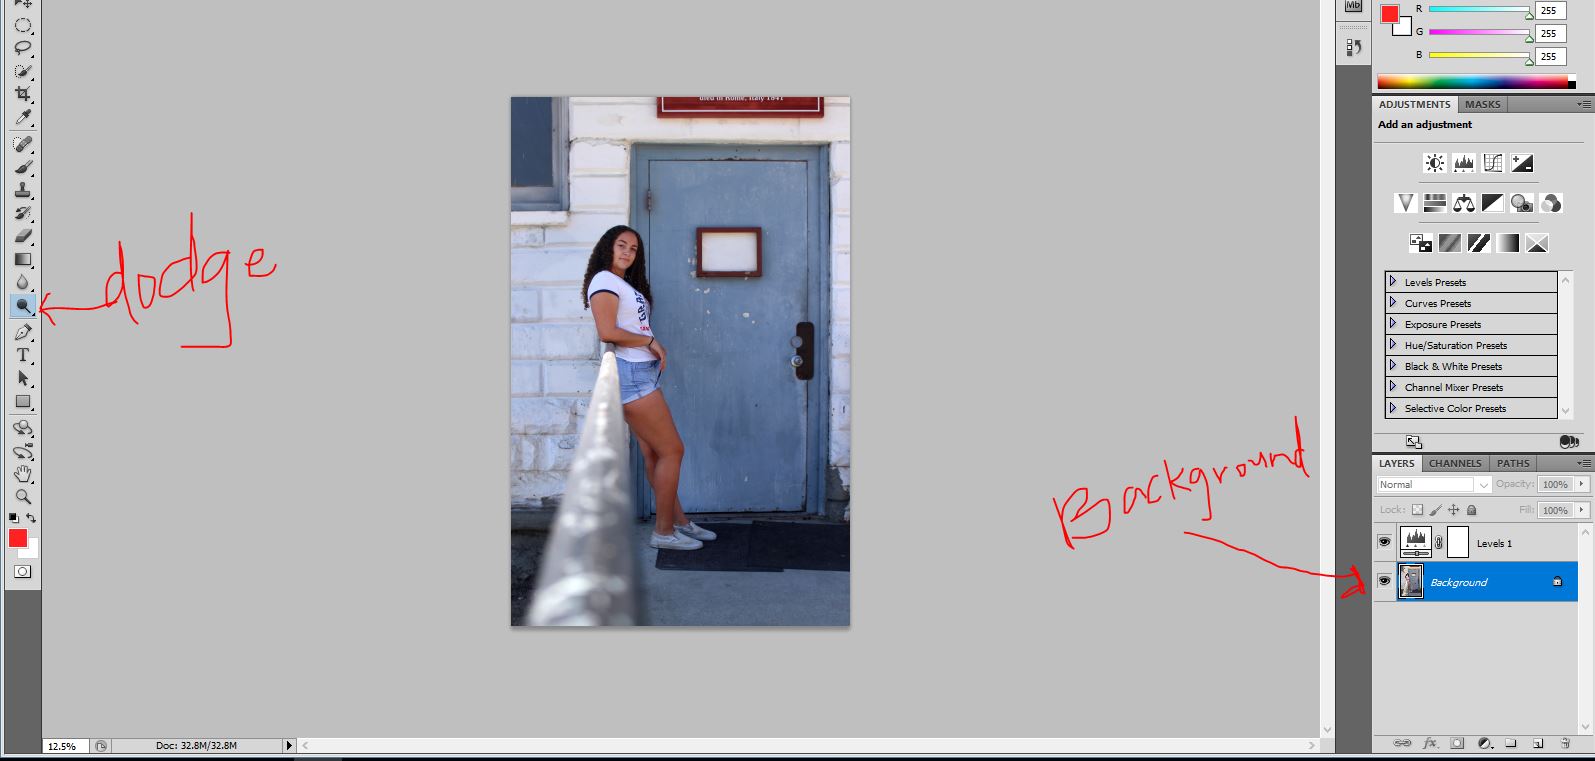
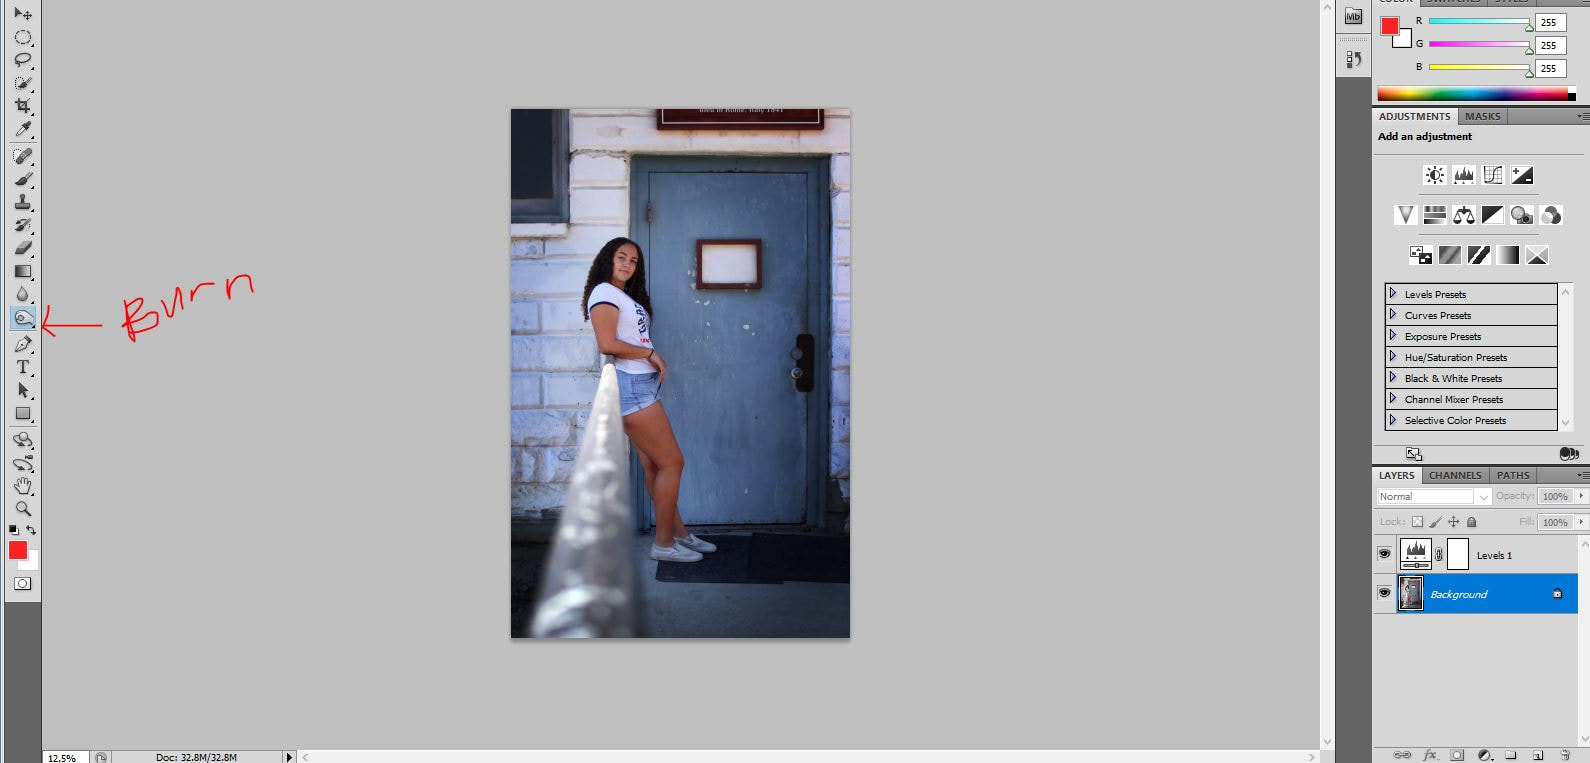
Assignment 2: Retouch
Objectives:
-Use levels, crop, patch, clone stamp, and spot healing brush tools to touch up the old photo
Objetivos: -Utilice los niveles, el cultivo, el parche, el sello de clonado y las herramientas de cepillado de curación de puntos para retocar la foto antigua.
-Use levels, crop, patch, clone stamp, and spot healing brush tools to touch up the old photo
Objetivos: -Utilice los niveles, el cultivo, el parche, el sello de clonado y las herramientas de cepillado de curación de puntos para retocar la foto antigua.
1. Save the 'Retouch' photo from under RESOURCES on the home page.
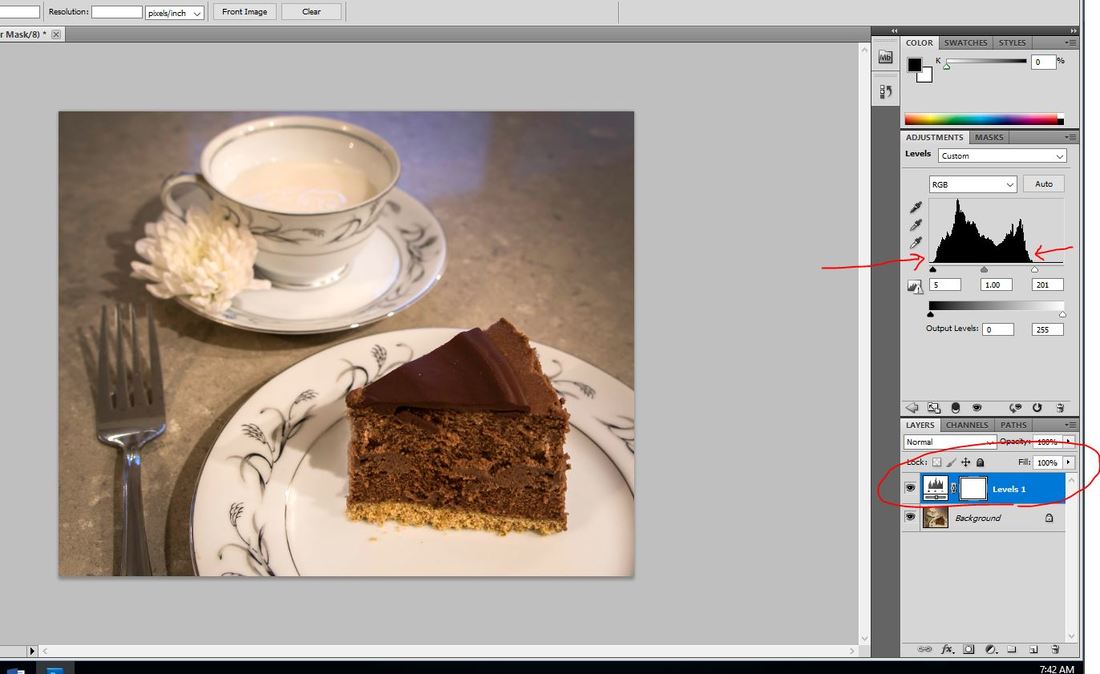
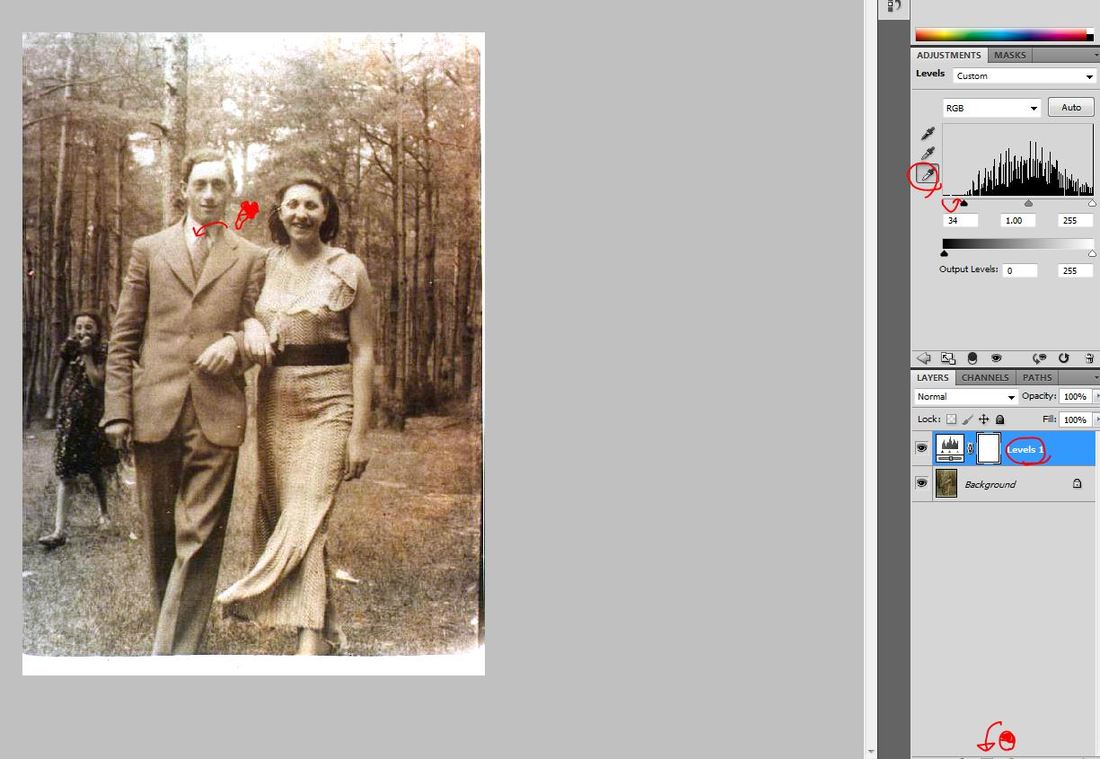
2. Open the retouch photo in photoshop and immediately fix your levels, which is located under the COOKIE under your layers panel. 3. Eyedrop the white on the mans shirt to fix the white balance and then MOVE THE SHADOWS ARROW TO THE END OF THE PEAK IN YOUR HISTOGRAM 1. Guarde la foto "Retoque" de debajo de RECURSOS en la página de inicio. 2. Abra la foto de retoque en photoshop e inmediatamente fije sus niveles, que se encuentra debajo de la COOKIE debajo de su panel de capas. 3. Eyedrop el blanco en la camisa del hombre para fijar el balance de blancos y después MOVER LA SOMBRA FLECHA AL FINAL DEL PICO EN SU HISTOGRAMA |
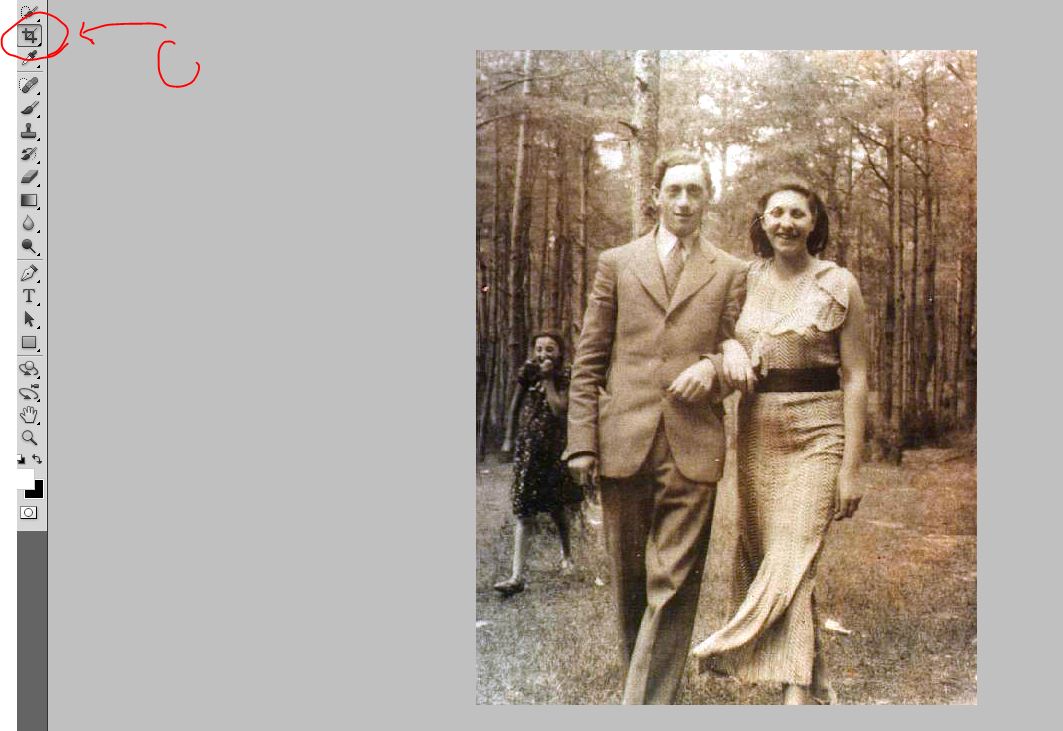
4. Use the crop tool (c) to take out the overexposure at the top of the picture and take off the white on the bottom.
4. Utilice la herramienta de recorte (c) para extraer la sobreexposición en la parte superior de la imagen y quitar el blanco en la parte inferior. |

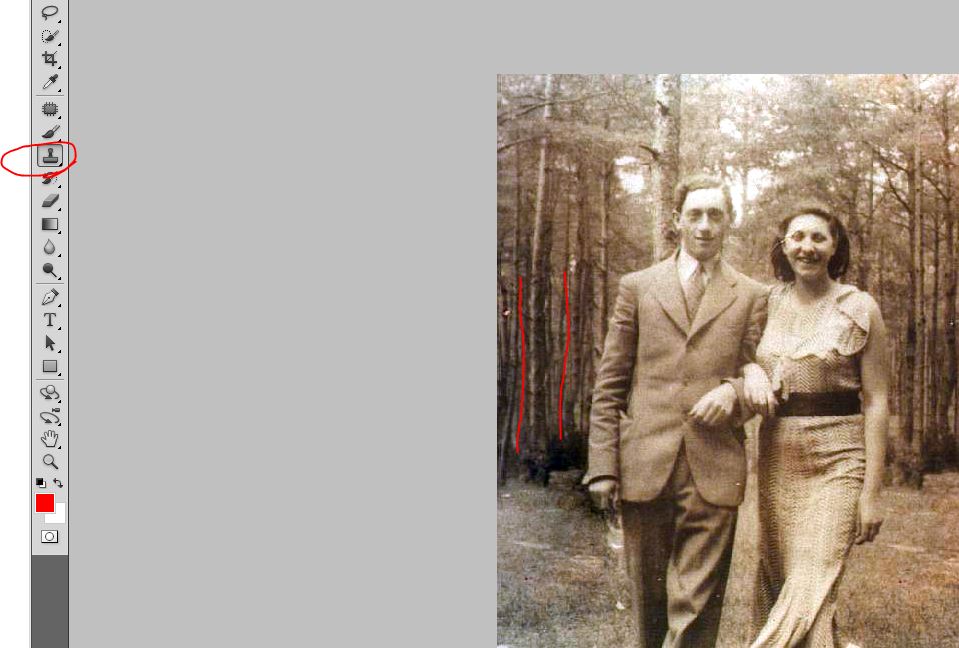
5. Click and hold the bandaid tool on the toolbar, select the PATCH TOOL. Make sure that you are on your background layer in order to make any changes to the picture! Draw the girl to create the marching ants and click and drag her to the left so that the base of the trees cover where she once was.
6. To deselect, Ctrl + d
5. Bajo la bandaid, seleccione la HERRAMIENTA DE PATCH. Asegúrese de que está en su capa de fondo para hacer cualquier cambio en la imagen! Esquema de la niña y moverla hacia la izquierda para que la base de los árboles se cubren donde estaba una vez.
6. Para anular la selección, Ctrl + d
7. Use the clone stamp tool to connect the tree trunks to the floor. To select where you want to clone from, hold ALT and click ONCE. Then color over the area that you want to replace.
7. Utilice la herramienta de sello de clonación para conectar los troncos de árbol al piso. Para seleccionar dónde desea clonar, mantenga pulsada ALT y haga clic en ONCE. A continuación, coloree sobre el área que desea reemplazar.
7. Utilice la herramienta de sello de clonación para conectar los troncos de árbol al piso. Para seleccionar dónde desea clonar, mantenga pulsada ALT y haga clic en ONCE. A continuación, coloree sobre el área que desea reemplazar.
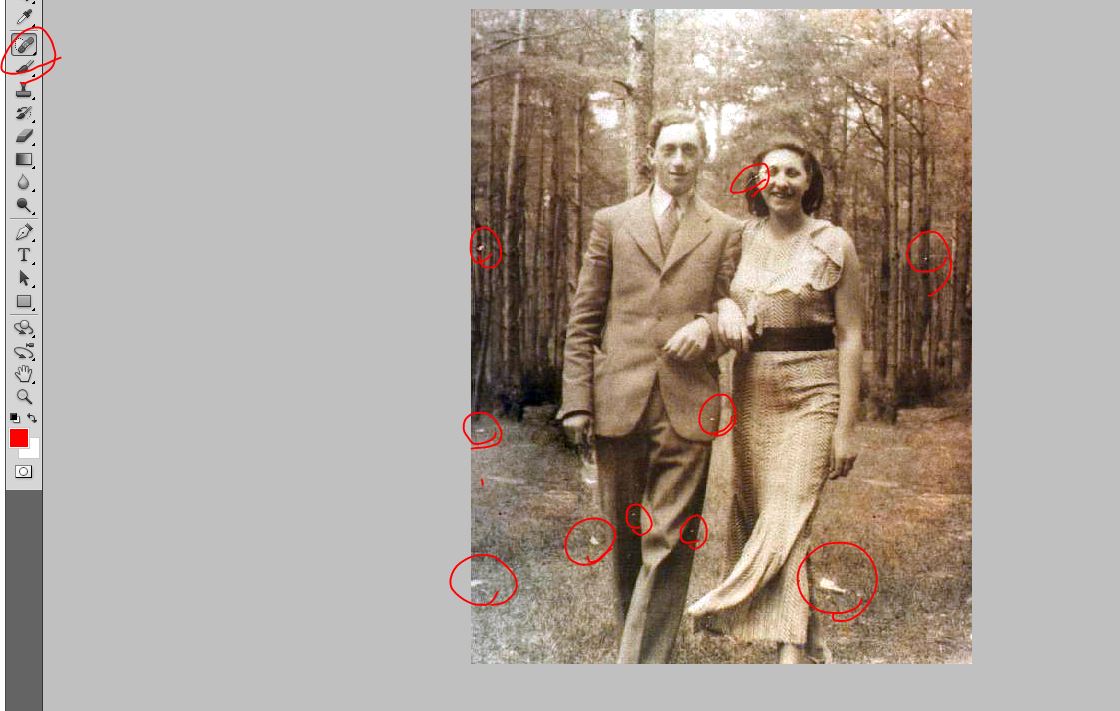
8. Use the Spot healing brush tool to clean up the little white spots around the picture.
8. Utilice la herramienta Pincel de reparación Spot para limpiar los pequeños puntos blancos alrededor de la imagen.
8. Utilice la herramienta Pincel de reparación Spot para limpiar los pequeños puntos blancos alrededor de la imagen.
Assignment 1: Montage
Objectives:
-Learn Free transform, move tool, and layers in Photoshop
-Create a themed montage using at least 15 photos from Google
The first step in this project is to collect all 15 of your images before starting in Photoshop. Use the size tool in the tools in google images to find LARGE images. Click on the "view image" link to save the images to your Montage folder in your pictures folder within your system folder.
Objetivos: -Learn Free transformar, mover la herramienta y capas en Photoshop -Crear un montaje temático con al menos 15 fotos de Google El primer paso en este proyecto es recoger todas las 15 de sus imágenes antes de comenzar en Photoshop. Utilice la herramienta de tamaño en las herramientas en las imágenes de Google para encontrar imágenes GRANDES. Haga clic en el vínculo "ver imagen" para guardar las imágenes en su carpeta Montage en la carpeta de imágenes de la carpeta del sistema.
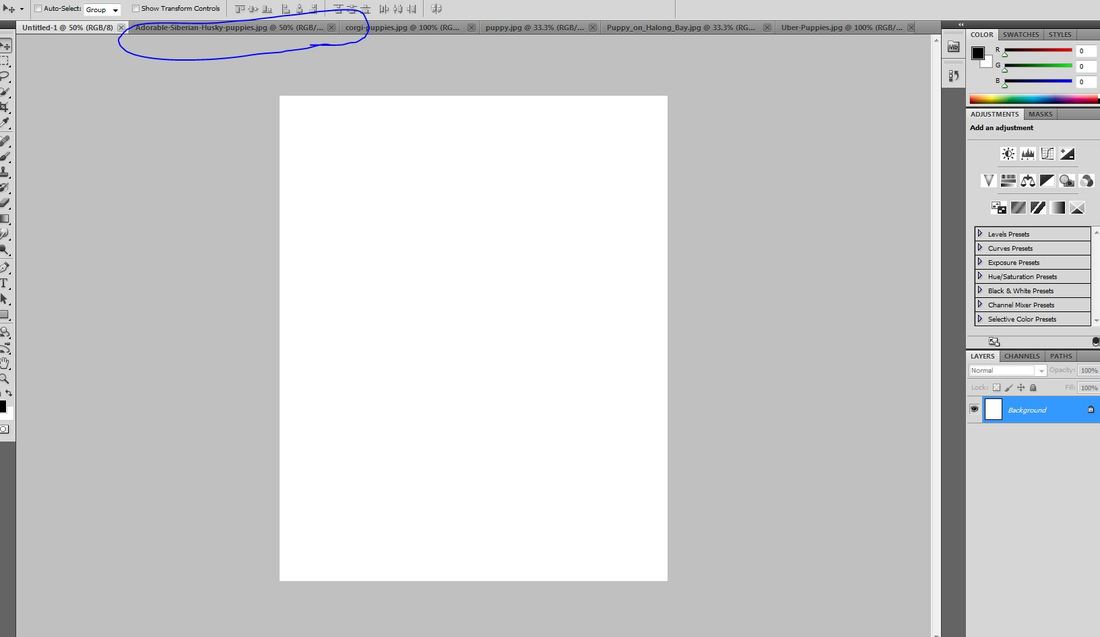
Step 1: After collecting all 15 images from google, create a new 16x20 inch document in photoshop. To Open your files: Open your file folder by using the microsoft windows logo at the bottom left of your desktop, and click on your name. You can access your Montage folder here. select all of your photos and drag them to your blank canvas. You will have to press enter between each photo as it appears on your screen.
Paso 1: Después de recoger las 15 imágenes de google, crear un nuevo documento de 16x20 pulgadas en photoshop. Para abrir sus archivos: Abra su carpeta de archivos mediante el logotipo de microsoft windows en la parte inferior izquierda de su escritorio y haga clic en su nombre. Puede acceder a su carpeta Montage aquí. Seleccione todas sus fotos y arrástrelas a su lienzo en blanco. Tendrá que pulsar enter entre cada foto tal como aparece en su pantalla.
Paso 1: Después de recoger las 15 imágenes de google, crear un nuevo documento de 16x20 pulgadas en photoshop. Para abrir sus archivos: Abra su carpeta de archivos mediante el logotipo de microsoft windows en la parte inferior izquierda de su escritorio y haga clic en su nombre. Puede acceder a su carpeta Montage aquí. Seleccione todas sus fotos y arrástrelas a su lienzo en blanco. Tendrá que pulsar enter entre cada foto tal como aparece en su pantalla.
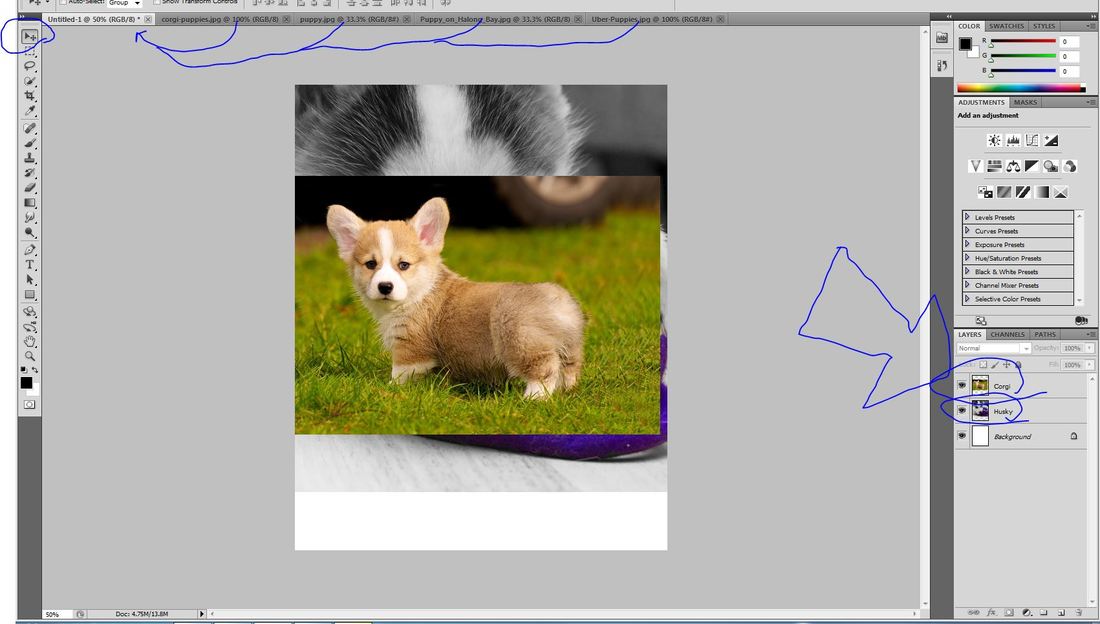
*** If you don't drag your photos, and open them instead: Using the move tool, move each of your images onto the same new document. AS YOU ARE MOVING THEM OVER, DON'T FORGET TO LABEL THEM IN YOUR LAYERS
*** Si no arrastra las fotos, y las abre en su lugar: Con la herramienta de desplazamiento, mueva cada una de sus imágenes al mismo documento nuevo. COMO USTED LOS MUEVE, NO SE OLVIDE DE ETIQUETARLO EN SUS CAPAS
*** Si no arrastra las fotos, y las abre en su lugar: Con la herramienta de desplazamiento, mueva cada una de sus imágenes al mismo documento nuevo. COMO USTED LOS MUEVE, NO SE OLVIDE DE ETIQUETARLO EN SUS CAPAS
Step 2: Once you have moved all your photos onto the same document, start to resize them by using free transform. The shortcut is Ctrl + t. DON'T FORGET TO HOLD SHIFT WHILE RESIZING TO KEEP THE PHOTO IN PROPORTION. After you are finished resizing press enter to continue.
Paso 2: Una vez que haya movido todas sus fotos en el mismo documento, empiece a cambiar su tamaño mediante la transformación libre. El acceso directo es Ctrl + t. NO SE OLVIDE DE SOSTENER CAMBIO MIENTRAS REDIMENSIONANDO PARA MANTENER LA FOTO EN PROPORCIÓN. Cuando haya terminado de cambiar el tamaño, pulse enter para continuar.
Paso 2: Una vez que haya movido todas sus fotos en el mismo documento, empiece a cambiar su tamaño mediante la transformación libre. El acceso directo es Ctrl + t. NO SE OLVIDE DE SOSTENER CAMBIO MIENTRAS REDIMENSIONANDO PARA MANTENER LA FOTO EN PROPORCIÓN. Cuando haya terminado de cambiar el tamaño, pulse enter para continuar.
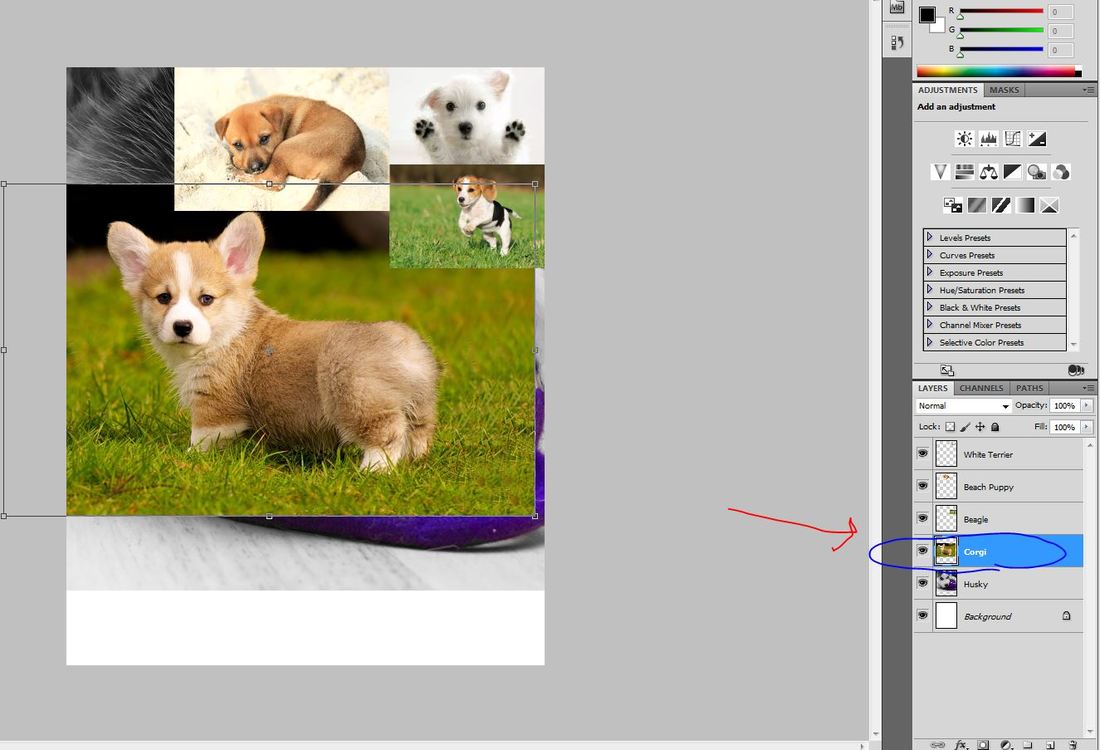
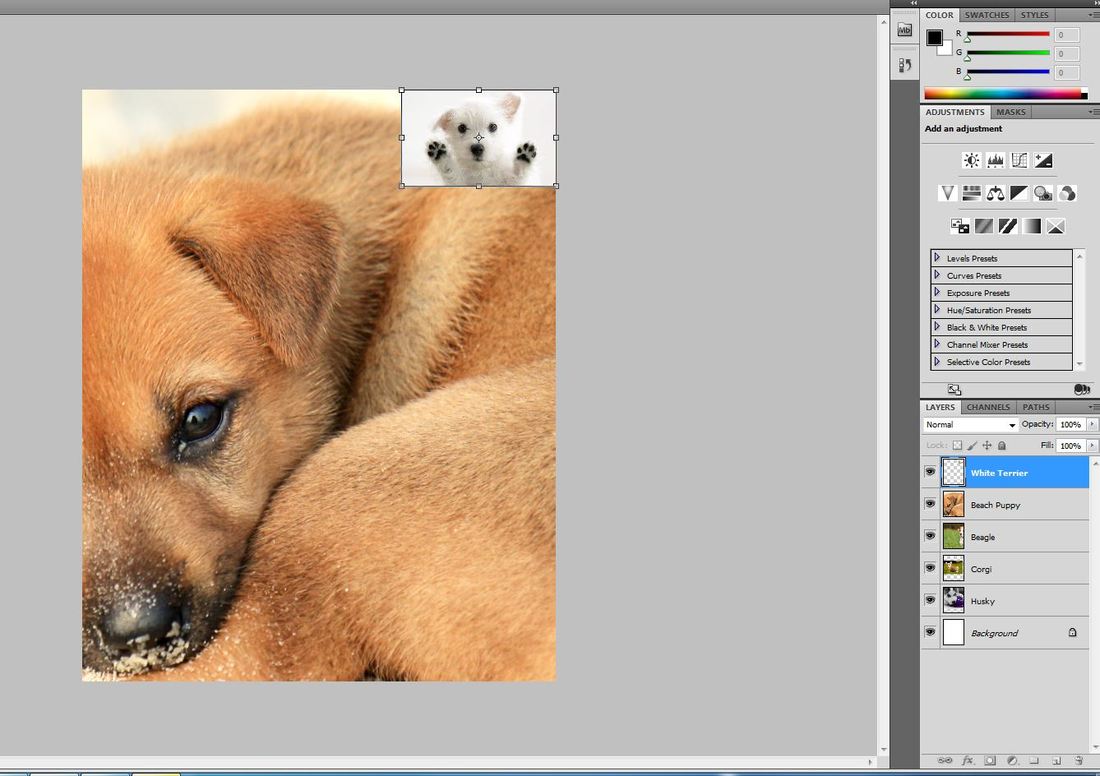
In order to resize and move each image, you need to be selected onto the layer that it is on. Continue with these steps until you fill your screen with your 15 (or more) images. NO WHITE SPACES
Con el fin de cambiar el tamaño y mover cada imagen, debe ser seleccionado en la capa que está en. Continúe con estos pasos hasta que llene la pantalla con sus 15 (o más) imágenes. NO ESPACIOS BLANCOS
Con el fin de cambiar el tamaño y mover cada imagen, debe ser seleccionado en la capa que está en. Continúe con estos pasos hasta que llene la pantalla con sus 15 (o más) imágenes. NO ESPACIOS BLANCOS
